(available in ![]()
![]() )
)
Spectra OnLocation is a add-on tool for Spectra Professional that is designed to allow studios to take Spectra on location for image capture and order entry, and then return to the studio and import the new images and data into the main studio Spectra database. Using Spectra OnLocation in conjunction with Spectra’ automated features, such as Client Import, Bulk Scheduling, Bar Code printing and scanning, and Hot Folder capture, make OnLocation a tool that can streamline any event.
In Spectra, go to Maintenance > Studio > OnLocations.
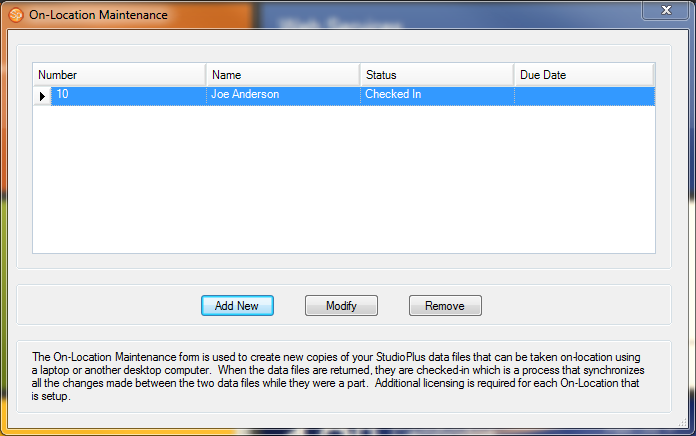
OnLocation Maintenance
Click Add New. You can only add as many OnLocation units as licenses you have purchased.
Once you click Add
New you'll be prompted to enter your OnLocation
Product Code.
Note: If you do not have an OnLocation Product Code and would like to purchase one or receive
additional information, please contact your Spectra dealer or call
(888) 862-4868.
Complete the registration.
Enter the OnLocation Number (any number between 10-99), and the Name of the OnLocation (such as “Elegance Studio Events”) and click OK.
You will now see your OnLocation unit in the Maintenance screen with the status of “Checked-In.” It is ready to be checked out.
Connect the computer you'll be using on location
to your local network, attach to your main Spectra data, and open
Spectra.
Note: The computer you will be using
on location must initially be connected to the local network and have
Spectra installed and running before you can check it out.
On that same computer go to File > Check Out OnLocation.
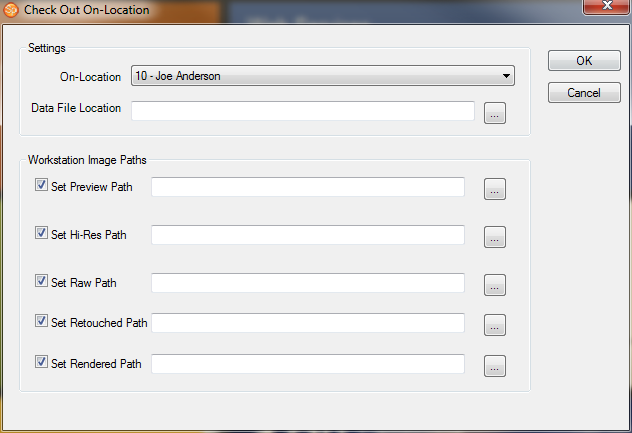
OnLocation Check Out
Select the OnLocation name you are checking out.
Set the Data File Location. This is the folder on your computer’s local hard drive that will store the data while you're on location. Do not use a network location since you will not be connected to your network while you are away.
Set the Workstation
Image Paths.
These are the folders that will be used to store the images you capture
while you are on location.
Note: We recommend you create a folder
on your C drive called “OnLocation” and then direct the data and the
image paths to that folder. Spectra will create subfolders for each
session in that folder, the same way Spectra Professional does at
your studio.
Click OK and an OnLocation database will be created.
You will be prompted to shut down Spectra and re-attach to the new OnLocation data files. Click Yes.
Restart Spectra. You will now be in the OnLocation database. A message will
appear indicating how many days you have until the database must be
checked back in.
Note: You can only be checked out
for 14 days. If you do not check the OnLocation back in you will not be able to access
it until you do.
You will notice that the company name in the upper right of Spectra now indicates the OnLocation name.
You can now use Spectra, modify or add records, process new images, create orders and collect payments on location – just like you do at your studio.
Checking in the OnLocation unit will take all of the data and synchronize it with your studio data and import all the images into the studio image folders.
When you're ready to check in your OnLocation, connect your computer to the studio network.
Open Spectra and go to File > Check In OnLocation.
The data file and images paths will default to the studio network locations.
Confirm the data files path and the images paths and click OK.
Your images will be copied to the studio image folder and your data will be imported into the studio database.
When the process is finished, Spectra will close. When you re-open Spectra, you'll be attached to the studio database, not the OnLocation database.
You can now check out the OnLocation unit again whenever you need to.
During the check out process, a new mirrored database will be created on the OnLocation unit. You can choose to create either a SQL Server database or a MS Access database on your OnLocation unit. During the check-in process, all changes made to the OnLocation database will be synchronized back into the main SQL Server studio database.