
(available in ![]()
![]()
![]()
![]()
![]() )
)
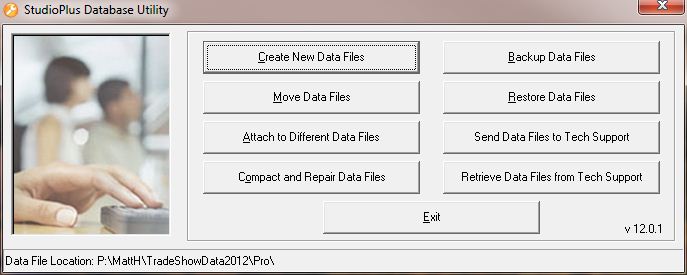
The Spectra Database Utility is used to maintain the Spectra data files. To use the Database Utility, click the Start Menu > Programs > Spectra 2011 > Utilities > Database Utility.
Database Utility
Create New Data Files - Use this feature only if you want to create a new blank set of data files. You will be prompted to choose a location for the new data files. You must select an empty folder that does not contain a set of data files.
Move Data Files - Use this feature to move your data files to a new location. This is commonly used when upgrading from a Single User Installation to a Multiple User Installation to move the data files to a new location on your file server. Click Move Data Files and you will be prompted to select a new location for the data files. You must select an empty folder that does not contain a set of data files.
Attach to Different Data Files - Use this feature to connect to a different set of data files than you're currently connected to. You will be prompted to choose the data files you wish to connect to.
Compact and Repair Data Files - This feature exists for two reasons. First, to keep your database running optimally, it is recommended that you compact your data files regularly. Second, if you ever receive an error similar to "Unrecognized Database Format" when launching Spectra, your data files will need to be repaired. It is recommended that you back up your data files prior to running a Compact and Repair.
 |
HERE'S A FLASH FOR YOU!
It's highly recommended that you compact your data files periodically, at least weekly. Why? Spectra stores its data in Microsoft Access data tables and builds its own internal temporary files. Running a compact rebuilds the data tables and removes any temporary files. Not only will your data files be reduced in size, but performance can increase and data corruption can be prevented. |
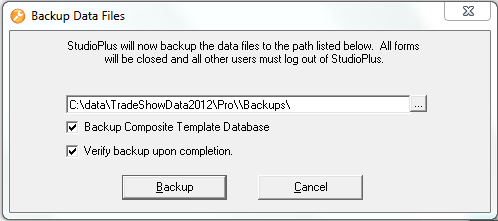
Back Up Data Files - Use this feature to create a backup copy of your data files. After clicking this button you'll be prompted to choose a location for your backup. If you choose the default backup folder, you are responsible to copy these files to a separate media, like a zip disk, CD, or backup tape. You can choose to Back Up Composite Template Database as well. If you are using the Composite Template feature you should back up your Template Database also. Your Composite Templates are stored in a separate database file call "SPImages.mdb". You also have the option to Verify Backup Upon Completion. This will verify the completed backup and may result in the backup process taking longer than normal.
Back Up Data Files
 |
ATTENTION!
Make sure you back up your data files DAILY by using either the Spectra backup utility or your own backup software! If your data files become corrupted beyond repair or if your hard drive crashes, you will lose all your data unless you have a current backup. |
Restore Data Files - Use this feature if you ever need to restore a backup copy of your data files. Remember, this feature will replace your current data files with a previous copy. Only proceed if you no longer need the data files you are currently attached to! Click Restore Data Files and select the folder containing the backup you want to restore. Then select the specific backup you want to restore and click Restore.
Send Data Files to Tech Support - Use this feature only when instructed by a StudioPlus technical support specialist. Doing so will zip your data files and transfer them over the Internet to the StudioPlus Technical Support Department.
Retrieve Data Files from Tech Support - If tech support needs to send data back to you, this feature will simplify the process. Tech support will give you a code to retrieve your data. It will come back to you in the form of a backup. Simply fill in the code, let the file complete it's transfer, and then click Restore Data Files to choose the retrieved file. It will be the last backup available for the current day. Note: If there is more than one backup for the current day, it will be the one with the highest letter appended to the filename.
![]()