(available in ![]()
![]()
![]() )
)
Spectra has the ability to copy all the yearbook images for a specific school and class to a new directory in order to create a yearbook CD. You must already be using the Yearbook Image feature in Spectra in order to use the Yearbook CD feature.
The file and image for Spectra's Yearbook CD feature are created to abide by the PSPA Digital Data Guidelines for School Photography and Yearbook Publication. These file requirements include additional information that Spectra does not track, so there may be fields that are not populated. For more information on PSPA Guidelines visit: http://www.pmai.org/WorkArea/showcontent.aspx?id=5568
Go to Tools > Make Yearbook CD.
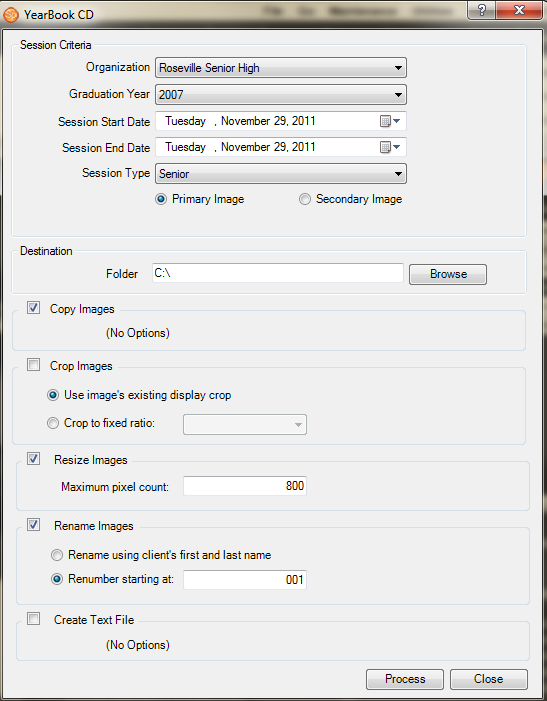
Yearbook CD Window
In the Session Criteria section select the criteria that should be used to find the correct session records. Leaving a criteria blank will select all sessions regardless of that criteria. You will see a count of the number of sessions that match the selected criteria.
Choose if you will be using the Primary Yearbook or Secondary Yearbook Image. If a school requires both, you will need to go through the Yearbook CD process twice.
Select the destination folder. This is the folder where Spectra will put the copied yearbook images. Or, if you have already manually copied the images into a folder, select it here.
Choose Copy Images if you want Spectra to copy the images into the destination folder. If you have already done this manually you do not need to check this box. If you are copying images manually do not rename the images.
Choose Crop Images if you want Spectra to crop the images. Use image's existing display crop will use the crop that was set in the Digital Workflow or Sales Presentation screen. Using Crop to fixed ratio will center the crop on every image file.
Resize Image will downgrade the maximum pixel count.
 |
HERE'S A FLASH FOR YOU!
You may want to use image editing software such as Photoshop to retouch the images after you output them from Spectra. Then use an action to crop and resize as appropriate. |
Rename Images will rename the images, using either the client's first and last name or a number. This new number will be reflected in the text file.
Create Text File will create the necessary text file for the school to use.
Processing the images will take the selected actions, using the hi-res or retouched images for each yearbook image. Use the missing images text file to determine if any images are missing or were not assigned.
 |
WHAT IF I HAVE A DIFFERENT YEARBOOK
PROCESS?
Below we've outlined a number of different scenarios based on when you select the yearbook image, move the image, and crop and retouch the image. Example #1 - Select the yearbook pose, move, crop and retouch each image throughout the year If you select the yearbook pose throughout the year, and also want to move the image into a folder for the school and retouch the image throughout the year, here are the steps:
Example #2 - Select the yearbook poses throughout the year, but crop and retouch at the end of the year. If you select the yearbook pose throughout the year, but don't crop or retouch your images until the end of the year, you do not need to move the images manually, and can retouch and crop them after the Make Yearbook CD tool has copied the images.
Example #3 - Select the yearbook pose, manage the images, cropping, and retouching in Spectra. Follow these steps if you want to use Spectra to manage the images, cropping, and retouching.
|
![]()