Installation
Okay, let’s get started! Before you can use Spectra, you must install
it on each computer you plan to use it on. The installation process will
copy files and create settings based on your particular needs. To do this,
follow these instructions:
STEP 1: Read Installation Instructions
Please read this entire chapter FIRST! Having
a basic understanding of the Spectra installation process before getting
started can save time.
STEP 2: Spectra System Requirements
Make sure that the system on which you’re installing the program meets
the minimum system requirements to properly run Spectra:
Operating System |
Windows
XP, Vista, Windows 7, or Windows 8 |
Processor |
Pentium III |
Minimum
RAM |
512 megabytes |
Recommended RAM |
1 gigabyte |
Hard
Disk Space for Program Files |
200 megabytes |
Hard
Disk Space for Data Files |
2 – 20 megabytes |
Monitor Resolution |
1024 X 768 or better |
The Windows user must have local administrative rights on each computer
Spectra is being installed on. It is also a good idea to install
with the User Account Control (UAC) turned on in Windows 7 and Vista.
STEP 3: Download Installer
You can download the installer from the Downloads
page on our website. Look in the Current
Version section of the page for the most current installer.
Click Save to download the installer
to your computer. If you save the file to a network shared folder, you
can use it on more than one computer. Note:
This step is simply getting the installer from our website to your computer. You
can still use your current version of Spectra while the installer is being
downloaded. There will be no changes to your current program until you
actually run the installer (step 5 below). Depending on the speed
of your Internet connection, the download could take a while. If
you are upgrading an existing version of Spectra, continue with the next
step while the installer is being downloaded.
STEP 4: (Upgrades only) Back up Your Data Files...
 |
ATTENTION!
Backing
up Database Files
If you are upgrading
from an older version of StudioPlus Spectra, it is important for
you to back up your database files BEFORE installing the new version!
Open your StudioPlus Spectra folder (in Windows), click to open
the Utilities folder, and the click Database Utility.
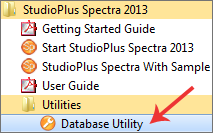
From the Database Utility, click Backup
Data Files. |
...and Uninstall Existing Version
If you have a previous version of Spectra installed on your computer,
follow the steps below to remove it:
Click the Windows Start
button and open the Control Panel.
Open Add/Remove
Programs if you are using Windows XP, or Programs
and Features on Windows 7 or Vista.
Highlight Spectra and click the
Add/Remove or Uninstall
button.
If you’re asked if you want to remove shared components,
choose "Yes."
If you get a message indicating a certain file
was not found, continue anyway.
STEP 5: Install Spectra
We recommend you close all applications
before beginning the installation process.
Use Windows to find the installation file you
downloaded in step 3. If you're not sure where it was saved,
search for a file that begins with "SPInstall." The
full name will incorporate the version number and release. For
example, one of the file names of the version 2013 installer is "SPInstall130103.exe."
Accept the License
Agreement to continue.
During installation, follow the online prompts
of the Setup Wizard. Unless
you're an experienced computer user, it’s our recommendation that
you accept the default program file location. Most setups should choose
the "all users" option, ensuring that Spectra will work
for anyone that logs into Windows on this computer.
You will be notified when the installation is
complete. Click OK to
complete the installation process.
STEP 6: Start Spectra and Enter Licensing Information
Choose your installation option.
 |
WHAT TYPE OF INSTALLATION SHOULD I CHOOSE?
- To
use the FREE single-user Express version, choose the first option.
- To
try out Spectra by evaluating more than one edition (Express,
Standard, and Professional), choose the Free 30-Day Evaluation option.
- If
you have already purchased a Spectra software license, choose
Paid
Product and then make one of the
following selections:
If you plan to run Spectra on just this
one computer, choose the Single
User option. It's easy to add
users later and you can then use the Database Utility
to move your data to a shared location. If you already have a network set up and
a shared folder prepared for the first computer, use the Network - First
Workstation choice. If this is a computer you are adding to
your network that should use the already shared data files,
use the Network
- Workstation Add-On selection. |
If you chose one of the network options, you will
be prompted to direct the installation to the shared folder. If
this is the first station install, navigate to the shared folder where
you want the database to reside. If this is an additional workstation,
you also need to navigate to the shared location and then choose the
database that is already in use. When setting up additional workstations,
the database will already contain the company and user information,
so the installation procedure will skip the next couple of steps.
The next page is where you put in all your company
information. In the Company
Name section, type in your studio name and other company information.
Note: All the fields can be changed
later EXCEPT the Company
Name field. Make sure
to type in your studio name exactly as you want it to appear throughout
Spectra, including reports, invoices, etc.! The program
will not let you continue until all fields are completed (except the
2nd line of the address).
|
ATTENTION!
The Company Name CANNOT be changed!
Make sure it is spelled and punctuated correctly – this is how it will appear
on your invoices, etc. |
Next you'll be prompted to provide the user’s
full name and initials (unless you are using the network add-on option).
For the "Free Express" and "30-Day
Trial" choices, the next
page will prepare you to activate your product. If you're installing
a paid product and chose "Paid Single" or "Network
- First Workstation," you will be prompted to enter your product
code(s) and you will be registered automatically.
The final page asks whether you want to launch
the Internet Update Utility. This
utility will automatically search our website for the latest service
release of Spectra. If you have an Internet connection on this
computer, you can launch the Internet
Update Utility now. Otherwise, just click Finish
to complete your installation. For more information on the Internet Update Utility, see the
"Internet
Update" topic in the "Database Utility" chapter.

Return to top
|