
Related Links
+ Knowledge Base
+ Technical Support Center
+ Spectra Training Videos
Applies To
| Spectra: | |||||
Article Information
Reference #: HT 00014
Author:
StephL
Created: 12.23.11
Last Revised: 05.20.12
How To: Manage High School Senior Workflow
What You Will Learn...
There are many features in Spectra that can be used by the high school senior photographer. This article is designed to show you some of Spectra's features that are specifically designed for high school senior photographers and to give you some good ideas for using them. Links will also be provided to more in-depth information for some of the topics.
NOTE: Several enhancements included in Spectra 2012 Volume 1 Service Release 3 (released May 15, 2012) significantly improve the process of tracking yearbook selections in Spectra. This article has been updated to reflect these enhancements.
+ Read the detailed release notes
This tutorial will cover the following:
» Senior workflow overview
» Initial setup for high school senior tracking
» Tracking your high school seniors
» Reports
Senior Workflow Overview
Over the years, Spectra has been developed into a powerful tool to help large and small studios effectively manage their high school senior workflow. Here's a brief overview of how it works:
As the foundation for the senior workflow, you will need to set up each school as an organization in Spectra. For each school/organization, you will enter important details such as contact information, class enrollment size, yearbook deadlines, yearbook image requirements, and more. This information will be available to you right from each client and session that is part of the organization.
As senior season begins, you will start entering student information into your database, either one-at-a-time or imported from a list. The student ID field in Spectra can be used to automatically spot duplicates as students are entered or imported. You will schedule each photo shoot as a separate session in Spectra and each session will be linked to an individual client. If you're using the digital workflow features in Spectra, you will import images, prepare sales presentations, make presentations to your clients, upload images to the web, and archive images – all from within Spectra.
Spectra's digital workflow also provides tools to track, prepare, and submit yearbook selections. Note: If you're not using Spectra's digital workflow, there are still several ways to keep track of yearbook selections, but you won't be able to take advantage of the yearbook image processing and yearbook reporting tools. As yearbook selections are made, Spectra can automatically create and assign tasks and/or select a yearbook status. You will be able to easily tell when a yearbook selection has been made (based on an assigned task or status).
You will need to prepare the yearbook images before submitting them to the school. Whenever a yearbook selection has been made, you can open the session and go the Organization tab. From here you can open the image for retouch (if desired) and then prepare the image. During preparation you will be able to adjust and crop the image using the appropriate cropping guide. When you're finished adjusting the image, Spectra will render out the final image using the correct size, DPI, and filename for the school. The file will then be stored in a yearbook folder Spectra creates for each school. As you select, retouch, and produce yearbook images throughout the year, they will automatically be placed into the appropriate organizational folder. When it's time to deliver the images to the school, you will use the Make Yearbook CD tool.
Now we'll take a look at the setup and tracking process in more detail.
Initial Setup
A few minutes of program setup will make senior data management easier than ever! You only need to set up the following items ONCE for your studio. For each senior season, simply go back and make sure these items are already set up properly for your studio.
- Set up each high school you photograph as an organization in Spectra.
- Go to Maintenance > Client > Organizations. When naming your school organizations, don't worry about the year. Later, you'll select the organization (school) and the graduation year when you're importing or inputting student information. This information will automatically carry over to the session(s) you create for each client.
- If you will track yearbook selections using Spectra's digital workflow, set up the additional details on the Yearbook Options tab for each organization (school).
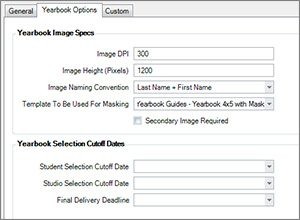
Enter the Image DPI and Image Height required by the school. Spectra will use these settings when preparing the images for the school. You can also choose how the files will be named and/or which cropping template should be used in the preparation process. NOTE: You only need to complete the filename and template fields if you need to override the default studio settings for an individual organization. You'll set up the default studio settings in step 2. You may also want to enter any selection cutoff dates and a delivery deadline.
- Set up general preferences for your high schools. Go to the Organization tab in Maintenance > Preferences > Studio Preferences.
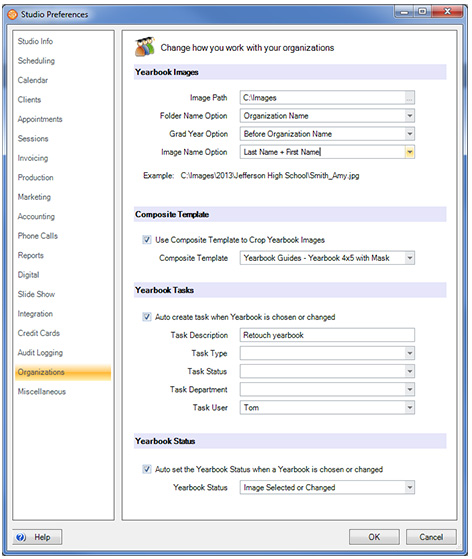
These general settings include the default path for yearbook folders, image naming options, default yearbook cropping template (used when preparing yearbook images), and options to have Spectra create tasks and/or assign a yearbook status automatically when yearbook images have been selected. See the "Studio Preferences - Organizations" section of the user guide for more information. Note: Yearbook statuses have been added in Spectra 2012 Volume 1 SR 3. If you haven't set up yearbook statuses, refer to step 9 (below). - If you need to track yearbook poses and are not using the digital workflow features in Spectra, you can still use the yearbook image field on the organization tab to record the yearbook selection. Tip: Another way to track yearbook poses is on the invoice. Add an item to the price list called "Yearbook Pose." Go to Maintenance > Price Lists > Price List to add this item. You can then find all the invoices that contain this item.
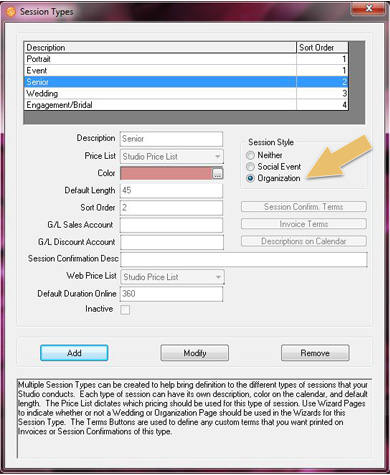
- Make sure that each type of senior session is designated as an Organization Session Style. Go to Maintenance > Session > Session Types.
- Go to Maintenance > Client > Client Groups and add a new senior group called "Senior." Don't worry about the year here, either. You may also want to add a group for your ambassadors. Keep in mind, client groups are your key to successful marketing!
- If you want to track how new clients hear about you or if you have an ambassador program, go to Maintenance > Client > Lead Sources and add lead sources such as "Ambassador," "Radio Ad," "Referral," etc.. You can also use the Referred By field on the client record to record ambassador referrals.
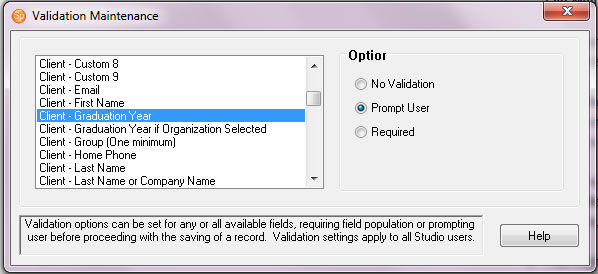
- You might be wondering how you’ll remember to fill in the organization (school), the graduation year, the lead source, and the client groups when entering your clients and sessions. Don't worry! Spectra makes it easy. Add prompts to your client and session screens to make sure data is entered for important senior fields such as Organization and Graduation Year if Organization is Selected. Go to Maintenance > Studio > Data Entry Validations and select the validations that work for your studio.
- There are several yearbook cropping templates included in Spectra 2012 Volume1 SR3. You can also create your own composite templates for yearbook cropping in Maintenance > Digital > Composite Templates. Cropping templates are used when you're preparing yearbook images for the school.
- Go the Maintenance > Session > Yearbook Statuses and set up yearbook statuses of "Image Selected or Changed" and "Image Ready."
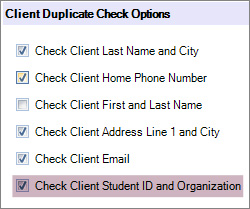
- If you'll be entering student IDs, go to Maintenance > Studio Preferences > Clients and select the option to check for duplicates based on student ID and organization.
Tracking Your High School Seniors
Below you'll find the basic steps you will go through as you record and track high school senior data in Spectra. The steps include: entering prospects and clients, booking sessions, capturing images, recording print orders, and tracking yearbook poses.
Step 1: Entering Prospects and Clients
- Adding Individuals: As you add high school seniors to your database, select the appropriate Organization and Graduation Year and enter the Student ID (optional).
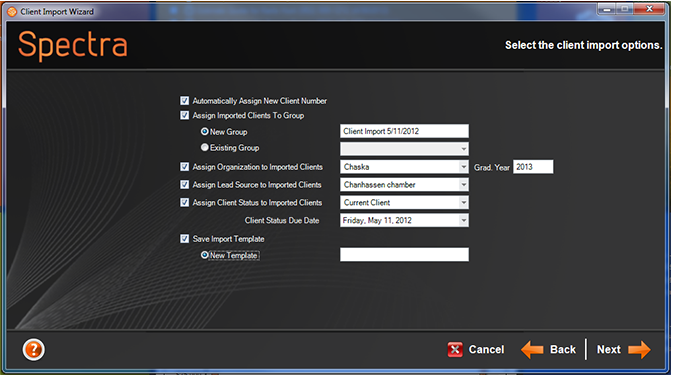
- Importing a List: You can also import high school seniors into your database from a text file or Excel spreadsheet. Go to Utilities > Import Clients. The Client Import Wizard allows you to select the Organization, Graduation Year, and Lead Source for the entire import. You'll can also choose how to deal with duplicates that are found during the import. See the "Client Records" topic in the Spectra User Guide for more information.
Step 2: Booking Senior Sessions
- Individually: Use the Scheduling Wizard to add senior sessions. Be sure to select the appropriate Organization and Graduation Year. If you’ve already entered the Organization and Graduation Year on the client record, Spectra will automatically carry it over to the session.
- Bulk Scheduling: Use the Bulk Scheduling Wizard under the Tools menu to create sessions for every student in an organization or group. For more information on using the Bulk Scheduling Wizard see the "Bulk Scheduling" topic in the user guide or view the online training video.
- Communication: Use the Communication Wizard to generate letters, emails, or text messages to notify or remind students of the date and time of their session. SMS text messages are a great way to communicate with high schoolers! Use Triggers to automate these notifications. For more information on using the Communication Wizard see the "Communication Wizard" topic in the user guide.
- Session Fee Invoices: To record a session fee charged at the time of booking or on the day of the session, open the session and create a New Invoice. (Note: This may have already been done as part of the Scheduling Wizard.)
Step 3: Capturing Images - Importing Images into a Session
- One session at a time (from a camera card or file/folder): If you are capturing your senior images to a camera card (one senior per camera card), or if the images already reside in a folder on your computer, you will use the Import Images feature to import the images into Spectra. One way to do this is to locate a session, open it, and then go to the Action tab on the ribbon and click Import Images. Because the Workflow hub is specifically designed for tasks related to your images, the preferred way to import images is by using the Workflow hub. Go to the Workflow hub and open the Capture Images workflow stage. Highlight the session and then click Import Images on the Actions group of the ribbon. For more information on capturing images see the "Capture Images" section of the "Digital Workflow" chapter in the user guide or view the online training video.
- Many sessions in a row (tethered): If you are capturing many seniors at a time and are shooting tethered you will want to use Group Capture, under Tools > Group Capture. You can search for an existing client or session, or scan a client or session barcode to find the student in your data. If needed, create the client and/or session record from the Group Capture screen. As images are taken, you can review them quickly before going on to the next student. For more information on the Group Capture feature in Spectra, see the "Group Capture" topic in the "Digital Workflow" chapter in the user guide or view the online training video.
Note: If you are shooting at the school you may want to use the Spectra OnLocation add-on. OnLocation allows you to take Spectra with you on location wherever you are shooting or selling. You then bring the OnLocation images and database back to the studio to synchronize with your main database. For more information see the "OnLocation" topic in the "Add-On Software" chapter in the Spectra User Guide or view the online training video.
Step 4: Recording Print Orders
Some studios print proofs and receive order packets in the mail, others go through an in-studio sales presentation, others upload and sell products online, and many probably use a combination of several methods. Whatever method you use to take an order, you will still need to create an invoice that is linked to the session. Depending on your unique ordering process, use one of the following methods to create a session-linked invoice:
- Start a Sales Presentation from a Session: Open the session and click Start Presentation on the Action tab of the ribbon.
- Start a Sales Presentation from the Workflow Hub: Select a session from the session list and click Start Presentation.
- Create a New Invoice from a Session: Open the session and click Session Invoice from the New group on the ribbon.
Then record the order – each package, product, and image ordered. Use Spectra's standard production workflow to track the fulfillment of each order.
Step 5: Tracking Yearbook Poses
- Non Digital: Open the session and use the Yearbook Image field on the Organization tab to record the selected yearbook pose. Or, use the "Yearbook Pose" item (created in step 2 of Initial Setup) on the invoice to enter the image number. A third option is to create a Custom Field on the session called "Yearbook Pose" and enter the image number there.
- Digital: The process to track and deliver yearbook images is broken down into multiple steps:
- Select the yearbook pose. The selection can either take place by the student via InSpiredByYou.com or by an employee within the studio. Spectra can then automatically set a yearbook status or create a task and assign it to an individual or department indicating the image has been selected and is now waiting to be prepared.
- Prepare the image. Once the image has been selected it needs to be prepared for the school, and Spectra is going to make it easy. Open the desired session and click the Organization tab. You can Retouch the image in Photoshop, and then click the Prepare button. The Prepare button will open the image with a cropping template (either the studio default or an alternate template set up for this organization) so you can zoom, position, and crop the image according to the school's standards. Click OK and Spectra will render out a new image according to the school's specifications (e.g., DPI, height, filename), storing it in a new folder dedicated to this school.
- Deliver the yearbook images. Go to Tools > Make a Yearbook CD and select options to output all the images for a school to a designated CD or folder, rename the images, and create a text file for the school. For more information see the "Yearbook CD" topic in the Spectra User Guide. Note: The previous Make a Yearbook CD tool has been modified and now pulls all the rendered yearbook images from the new organization yearbook folder.
Reports
Included Reports
- Organization List - Prints a simple list of all the organizations that have been entered in the Organization Maintenance list. The report includes the organization name, address, phone number, yearbook deadline, and yearbook requirements. Go to Reports > Organizations > Organization List to run this report.
- Organization Session List - Prints a status report of all sessions for one or more organizations. The report is based on a session date range or graduation year, and includes session number, date, client name, home phone, session status, as well as the yearbook pose (if selected). You can quickly see which students still need to select a yearbook pose. Go to Reports > Organization Reports > Organization Session List to run this report.
- Organization Session List - Not Photographed - Provides a list of all clients in one or more organizations that have not been photographed. The report includes client names, phone numbers, and status.
- Organization Session Summary - Produces a session summary for one or more organizations. The report is based on a session date range or graduation year. The report includes total enrollment, how many clients have been photographed and whether they have selected a yearbook pose, and how many clients have not been photographed and why.
- Yearbook Approval Report - Gives your studio the ability to preview all the yearbook images selected for an organization. There is an option to base the report on a graduation year. You may also choose which yearbook image to use (primary or secondary). This is a great report to deliver to the school yearbook advisor.
Dashboard Reports
Use your dashboard to create different trend and tracking reports. Go to Reports > Dashboard Reports to create new reports. Examples include:
- Number of Sessions Booked
- Photographed by Organization
- Total Sales
- Sales Average by Organization
- Clients by Organization
Custom Reports
Additional reports are available online from StudioPlus. You can preview the reports and download just the ones you want to use. Simply click Download and save the report to your hard drive. Unzip the report. In Spectra, go to Reports > Custom Reports > Import Custom Report and select the desired report. Here are a some reports you may want to try:
- Sales By High School - Analyze your sales broken down by high school and graduation year.
- Referred By Report - If you are using the Referred By field on the client record you can get a report of referrals broken down by who referred them, the number of sessions, and sales totals.
- Seniors without Sessions - You can see which senior clients don't have a session booked yet.
Filters
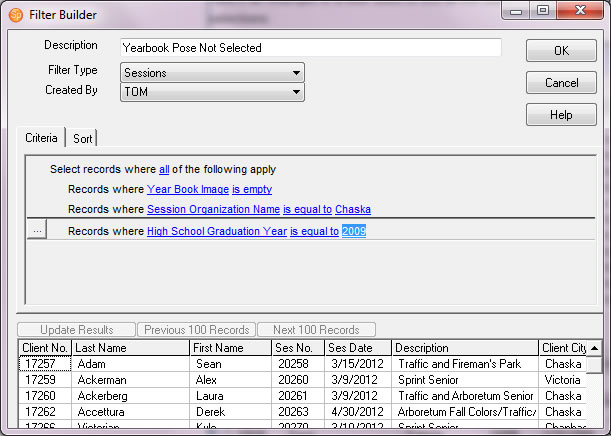
Use the Filter Builder to create filters for your information. Save your filters and apply them to hubs, lists, and reports. Here’s an example of a filter used to find all the students in one school that still need to make yearbook pose selections:
Additional Tools
Spectra OnLocation
If you are looking for a way to take Spectra's powerful database and imaging features with you when shooting on location at a school or event, Spectra OnLocation is the perfect way to do it. All the data and images you capture while away will seamlessly synchronize with your studio data upon return, allowing you to add student information, capture images, and even print contact sheets or record orders while on location.
+ Visit the Spectra OnLocation product page
+ Watch the OnLocation video overview
InSpiredByYou.com
InSpiredByYou.com is Spectra's integrated online gallery and ordering solution, with many features specifically designed for high school senior photographers. Session images are easily uploaded, creating a gallery for each student. Your senior clients are able to select their images, view an Animoto® video, invite friends to visit their gallery, share images on facebook and other social networks, choose their yearbook pose, and order prints and packages. All of this information is then downloaded seamlessly into Spectra for production. InSpiredByYou.com includes:
» Individual logins
» Yearbook pose selections
» Image security
» Animoto video upload
» Social network sharing
» Print and package ordering
» Multi-pose package ordering
» Automatic add-on pose fees
» Promotion codes
» Credit card integration
» Seamless upload and download with Spectra
+ Visit the InSpiredByYou product page
Additional Resources
Spectra Training Videos:
» Scheduling: "Scheduling Wizard"
» Scheduling: "Bulk Scheduling"
» Digital Workflow: "Group Capture"
» Digital Workflow: "Yearbook CDs"
» Tools & Settings: "Custom Reports"
» Tools & Settings: "Filters"
» Advanced Workflow: "Seniors"
» Marketing: "Automating with Triggers"