(available in ![]()
![]()
![]()
![]()
![]() )
)
In this topic... Show
In order to properly invoice clients for session fees, print orders, packages, or any other item your studio sells, you must create price lists. In Spectra, each price list is linked to a session type that you define. In the Standard, Professional and Enterprise versions of Spectra, you may have as many session types and price lists as you choose. For example, you may have several different types of senior sessions – senior yearbook, senior sports, and senior other. All of these sessions might be linked to the same price list – the Senior Price List. This price list would contain all the session fees and item prices for products related to any type of senior session. When an invoice is generated from a session, only the items on the price list assigned to that session are available for invoicing. More information about creating session types is found in the “Session Types” section of the "Spectra Maintenance" chapter.
 |
WHY USE MULTIPLE PRICE LISTS?
(available
in You should choose to use multiple price lists only if you charge different prices for the same product for different types of sessions. For example, if you charge one price for an 8X10 for a family session and a different price for the same 8X10 for a wedding, then you would want to use multiple price lists. |
|
WHY USE MULTIPLE SESSION TYPES?
You should choose to use multiple session types if you would like to track session trend information on reports. For example, if you'd like to know how many "Premier Weddings" you have done this year, and how many you've done compared to last year, then you'll want to use session types to track this information. Another benefit of using multiple session types is that you can define a default length for each type of session and a different color to display the session on the calendar screen. You must use multiple session types if you want to use multiple price lists. |
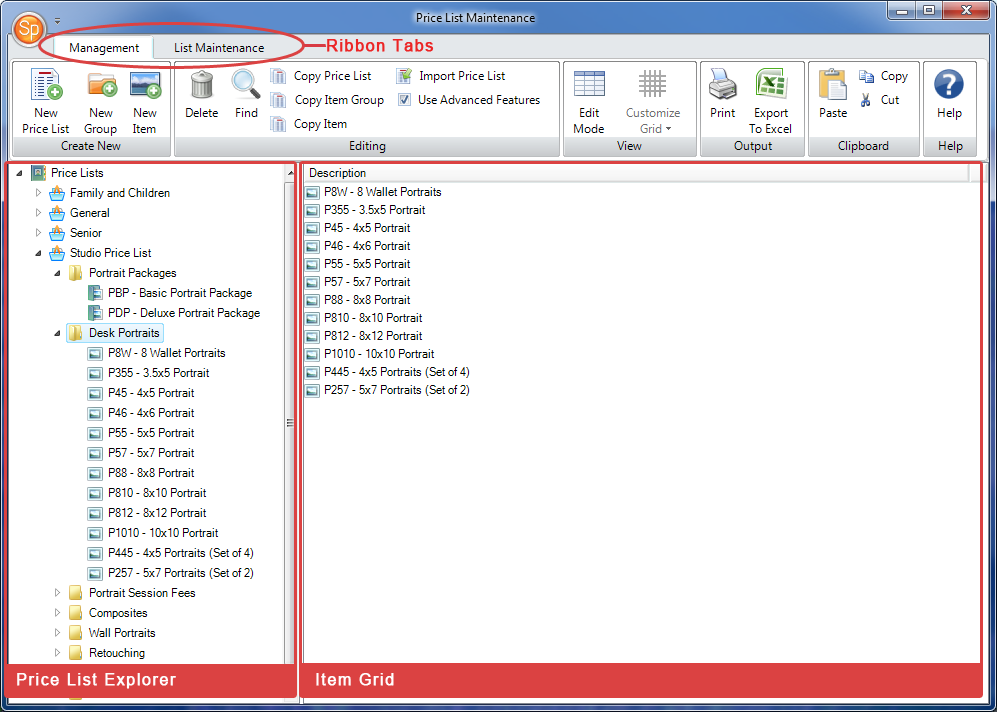
You'll set up and maintain your price lists by going to Maintenance > Price List > Price Lists. There are two main tasks involved in price list maintenance. The first is to create and name your price list(s) and decide on what groups you'll need to organize the items within each price list. This will be done on the Price List maintenance screen (shown below). Refer to the "Price Lists" topic for a detailed description of the features on this screen.
The second task is to set up all the items – including individual products, packages, and services – that your business sells. This will be done using the Price List Item maintenance screen. See the "Price List Item Maintenance" and "Package Maintenance" sections below for details on how to set up your price list items.
(available in ![]()
![]()
![]()
![]()
![]() )
)
The Price List Item maintenance screen holds details for each individual retail item sold by your company. Many of the tabs and fields on the Price List Item maintenance screen are optional; however, the more you use them, the greater your flexibility in invoicing and reporting.
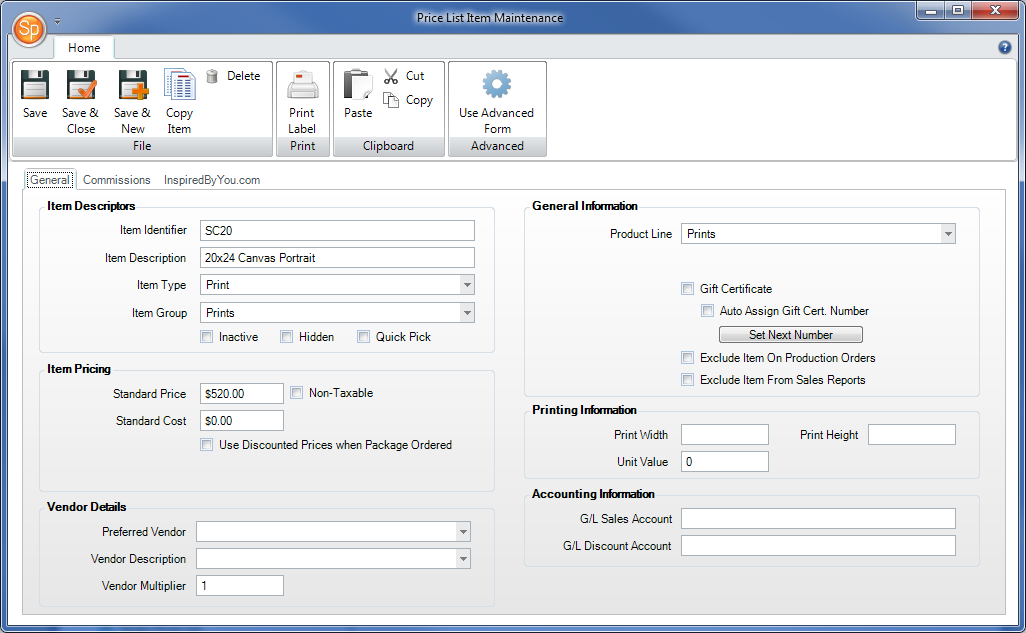
Price List Item Maintenance
Save - Save the item.
Save and Close - Save the item and close the item maintenance screen.
Delete - Select the item you want to delete and choose Delete.
Print Label - Print a bar code price label for this item.
Exit
From the Print group you can click Print Label to print an item label.
From the Clipboard group you can Cut, Copy and Paste selected text to and from the clipboard.
Cut - Highlight the text you want to cut and click Cut.
Copy - Highlight the text you want to copy and click Copy.
Paste - Paste previously cut or copied text from a large variety of applications by first cutting or copying the text and then placing your cursor in the desired location in the item and choosing Paste.
If you charge a different price for an item based on how many the client orders and/or wish to add options and enhancements to your products, click Use Advanced Pricing to enable the Pricing and Costs tab. On this tab you can create multiple price (and cost) levels based on quantity ordered as well as add various options and enhancements to your products. See the "Pricing and Costs Tab (Advanced Pricing)" section below for further information.
The General tab is where basic information about the item is located and entered, including description, price, vendor information, and more.
Item Identifier
- Determine an item identifier. Item identifiers can be any combination
of letters and numbers, up to 12 digits in length. The item identifier
must be unique within each price list but may be used again in other
price lists, except in the
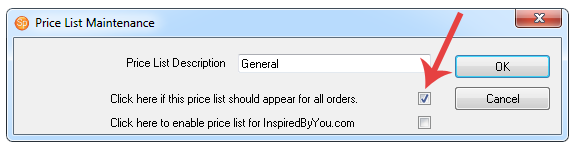
case of price lists that have been set up to appear on all orders
(see image below). If this option has been checked for a price list,
the item identifiers must not be used in any other price lists.
Description - Enter the description of the item as you would like it to appear on the client invoice. (Required)
Item Type - Select one of Spectra's predefined item types for this item. (Required)
Item Group - Select or modify the item group this item belongs to. (Required)
Inactive - Check this box to make a price list item inactive.
Hidden - Hide items you include as a part of a package, but do not sell ala carte. Hidden items will not appear in the price list, but can still be added to an invoice by typing the item identifier in the invoice detail line.
Quick Pick - Select the products you want to appear on your "Quick Pick" list during a sales presentation. If this is a commonly sold item, then select Quick Pick so you can easily select it while invoicing.
Standard Price and Cost - Enter the standard price and cost of the item here if you did NOT select Use Advanced Pricing on the ribbon. If you are using advanced pricing, the "Standard Price" and "Standard Cost" fields will not be active on the General tab. See the "Pricing and Costs Tab (Advanced Pricing)" section below for details. (Item price is required.)
Non-Taxable - Check this box if the item is always non-taxable. (Optional)
Use Discounted Prices when Package Ordered - Check this box if you would like Spectra to automatically charge the client a discounted price for this item if they also order a package at the same time. This feature allows you to give a better price to a client for an ala carte item when they also purchase a package. If this option is chosen, you also must fill in the Discounted Item Price that will appear below.
Discounted Item Price - Enter the discounted price of the item. This is the price that should be used for the item if a client orders a package at the same time. This field only appears on this tab when you check the Use Discounted Prices when Package Ordered checkbox and you are not using advanced pricing (see "Pricing and Costs Tab (Advanced Pricing)" section below).
Preferred Vendor - Select the vendor you purchase this product from most often. Maintain your vendor list in Maintenance > Production > Vendors. (Optional)
 |
ATTENTION!
Preferred vendors and new production orders. You must enter a preferred vendor if you want to be able to create a new production order from an Invoice and have the line item detail be entered automatically. |
Vendor Description - Select the proper vendor description from the options available by clicking the down arrow. Use this field if the vendor uses an item description that is different from the item description your studio uses. The drop-down list is controlled by Spectra and is not modifiable. However, you may type in a description that is not shown on the available list. (Optional)
Vendor Multiplier - If the vendor sells this item in set quantities, enter the appropriate number to multiply your quantity by in order to match the vendor’s set quantity.
 |
HERE'S A FLASH FOR YOU!
Vendor Multiplier The Vendor Multiplier works like an equation, based on units your studio sells compared to units the vendor sells. Here's a simple way to figure it out: For every X (number of units) I sell to my customer, I need to order Y (number of units) from the vendor. Y/X = Vendor Multiplier So, if wallet-sized prints sell as 1 page from the vendor, but you get 8 wallets on a page, your equation would be 1/8 = 0.125 |
Product Line
- (available in ![]()
![]()
![]()
![]() ) Select a product line for
the item. Product lines are used to group items that are of a similar
type for reporting purposes. Sales reports are grouped by product
line, so it’s extremely important to create product lines that will
group sales items in the way you want them to be reported. Create
and maintain your product lines in Maintenance
> Price List > Product
Lines. (Optional)
) Select a product line for
the item. Product lines are used to group items that are of a similar
type for reporting purposes. Sales reports are grouped by product
line, so it’s extremely important to create product lines that will
group sales items in the way you want them to be reported. Create
and maintain your product lines in Maintenance
> Price List > Product
Lines. (Optional)
Gift Certificate
- (available in ![]()
![]()
![]() )
Check this box if the item is a gift certificate. When checked, Spectra
will automatically select Non-Taxable.
Spectra will also ask you if you want to have a gift certificate number
automatically assigned, and what the starting number should be. When
you sell this item on an invoice, Spectra will assign a gift certificate
number, allowing you to track the gift certificate and enter the number
when a customer redeems the gift certificate.
)
Check this box if the item is a gift certificate. When checked, Spectra
will automatically select Non-Taxable.
Spectra will also ask you if you want to have a gift certificate number
automatically assigned, and what the starting number should be. When
you sell this item on an invoice, Spectra will assign a gift certificate
number, allowing you to track the gift certificate and enter the number
when a customer redeems the gift certificate.
Exclude Item On Production Orders
- (available in ![]()
![]()
![]() )
Use this option for session fees, package headers, and
other miscellaneous items that do not go into your production cycle.
Items marked will not be added to a production order, ensuring that
only items you actually produce are included on your production orders.
)
Use this option for session fees, package headers, and
other miscellaneous items that do not go into your production cycle.
Items marked will not be added to a production order, ensuring that
only items you actually produce are included on your production orders.
Exclude Item On Sales Reports - Use this option for items like gift certificates or gift cards to keep them from appearing on the Today's Snapshot panel of your Spectra Home page and from being included in your sales and profit analysis reports. These items will still appear on the "Invoice List" report.
Print Height and Width - If the item is a print, then enter the height and width of this product. (Optional)
Unit Value -
GL Sales Account
- (available in ![]()
![]()
![]() )
Select the specific general ledger account to which you want
sales of this item to be posted. If left blank, sales will post to
the default sales account listed on the Accounting
page in Studio Preferences
under General Sales.
If an accounting link is chosen, data will export to the sales account
listed here; otherwise, the account number or label merely prints
on all posting reports. (Optional)
)
Select the specific general ledger account to which you want
sales of this item to be posted. If left blank, sales will post to
the default sales account listed on the Accounting
page in Studio Preferences
under General Sales.
If an accounting link is chosen, data will export to the sales account
listed here; otherwise, the account number or label merely prints
on all posting reports. (Optional)
GL Discount Account
- (available in ![]()
![]()
![]() )
Select the specific general ledger account to which you want
any discounts on this item to be posted. If left blank, discounts
will post to the default discount account listed on the Accounting
page in Studio Preferences
under Discounts. If an accounting
link is chosen, data will export to the discount account listed here;
otherwise, the account number or label merely prints on all posting
reports. (Optional)
)
Select the specific general ledger account to which you want
any discounts on this item to be posted. If left blank, discounts
will post to the default discount account listed on the Accounting
page in Studio Preferences
under Discounts. If an accounting
link is chosen, data will export to the discount account listed here;
otherwise, the account number or label merely prints on all posting
reports. (Optional)
Based on the selections you make on this page, as well as on how you use certain features in Spectra, additional items may appear on this window.
Item Sales Tax - This option will only appear if you are using the line item level sales tax method (selected on the Invoicing tab in Maintenance > Preferences > Studio Preferences). Select the sales tax level from the drop-down list for this price list item. (Optional)
Composite Template
- (available in ![]()
![]()
![]()
![]() ) If the item is a composite you should
have selected "Composite" as the item type, enabling the
Composite Template
selection in the lower-right portion of the window. Select the composite
template for this item. When you create a composite for this template
it will be linked to this price list item.
) If the item is a composite you should
have selected "Composite" as the item type, enabling the
Composite Template
selection in the lower-right portion of the window. Select the composite
template for this item. When you create a composite for this template
it will be linked to this price list item.
(available
in ![]()
![]()
![]()
![]() )
)
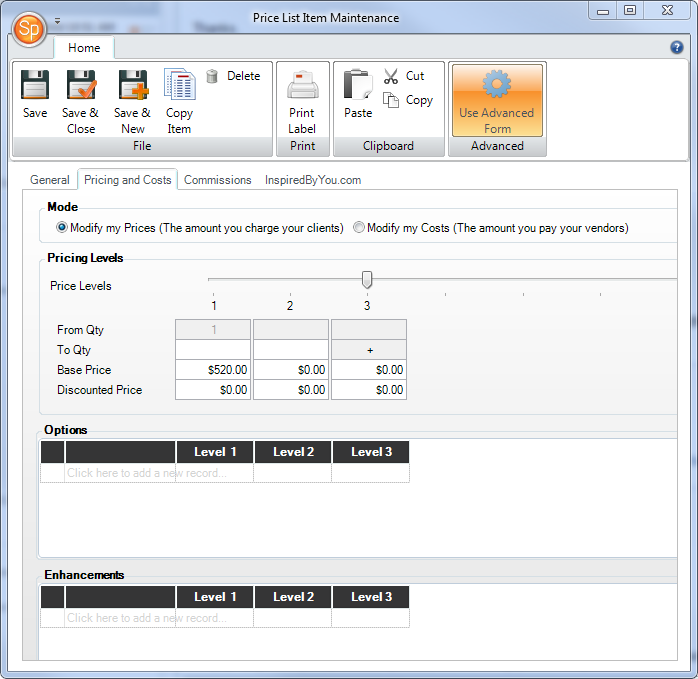
This tab is enabled when you click Use Advanced Pricing on the ribbon. It allows you to set different price levels based on quantity, add options and enhancements to the item, and set up item costs.
|
SHOULD I USE ADVANCED PRICING?
If you're setting up your price list and simply want to get it up and running quickly, you may not want to use advanced pricing. However, it can be to your advantage to use the features advanced pricing. You should use advanced pricing if:
|
Note: When using advanced pricing, you will not be able to enter or modify the standard price, standard cost, or discounted price on the General tab.
Click Modify my Prices to set up the amount you charge your clients for this item based on quantity ordered, as well as how much you charge for selected options and enhancements when added to this item. You can simply pick and choose which sections of this tab apply to the item you are pricing.
For some of your price list items you may use all the features on this tab. For example, on an 8x10 print you may want to include price levels for quantity-based discounts (i.e., to give a price break when three are ordered and again when five are ordered). You may also want to add options that can be chosen from when invoicing the 8x10 (i.e., add a price for your "Standard Mount" and "Classic Frame" options). Finally, you may also want to add some enhancements that can be chosen from when invoicing (i.e., add a price for your "Spot Color" and "Deluxe Retouch" enhancements).
For other items on your price list, you may just use one of the features on this tab. For example, on a senior session you may want to add a price for a "Location Fee" to the Options section so that it can be chosen when invoicing the session. In this case you would enter your session fee in the price level 1 column and there would be no need to create additional pricing levels.
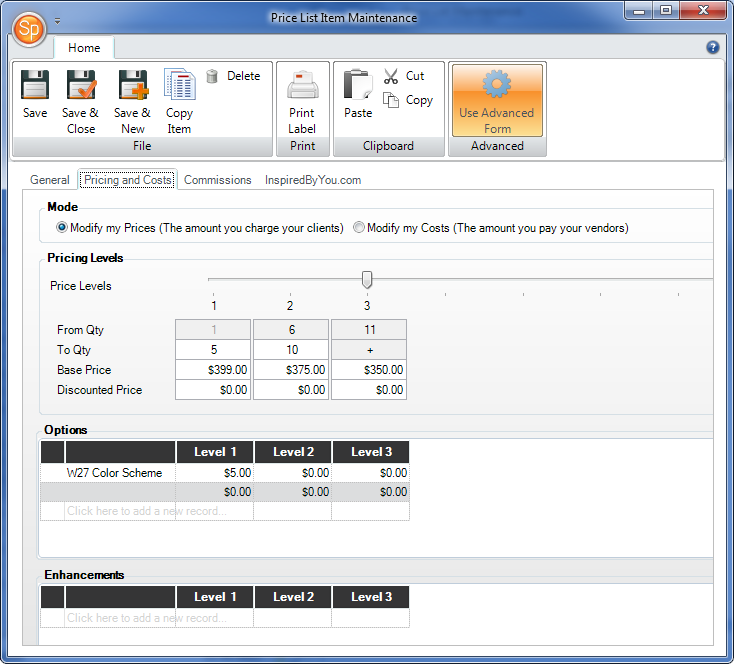
Pricing and Costs Tab - Prices Mode
Pricing levels allow you to define items quantities that qualify for a discount. For example, if the price of a print is reduced when more than five are purchased, that quantity and pricing information would be entered here. Spectra will then automatically calculate the correct price on the invoice based on how many prints are being ordered, eliminating the need to continually watch for quantity discounts!
Price Levels - Drag the slider to create additional price levels for quantity-based pricing, if desired.
From/To Qty - Spectra will automatically supply the From Qty as you enter the To Qty for each level. The To Qty of the last pricing level will always contain a "+" (representing "or more") to accommodate unlimited quantities.
Base Price - Enter the base retail price you charge for the item at each price level. If you're not using multiple levels, you'll just enter the base price in the first column.
Discounted Price - The discounted price entered here will automatically be used if a client orders this item ala carte at the same time they order a package. This feature allows you to give a better price to a client when they purchase a package. This line is only available if you check the Use Discounted Prices when Package Ordered box on the General tab.
Options may be added to the base price of an item at the time of invoicing. Examples include framing, mounting, or sprays. Select an option that should be offered with this item and then enter the price you'll charge at each pricing level. If there is only one pricing level, enter the price in the first column. Click the next row to add another option. Set up and maintain your options list under Maintenance > Price List > Item Option List.
Enhancements such as retouching can also be added to the base price of an item at the time of invoicing. Select an enhancement you would like to offer with this item and then enter the price you'll charge at each pricing level. If there is only one pricing level, enter the price in the first column. Click the next row to add another enhancement. Set up and maintain your enhancements list under Maintenance > Price List > Item Enhancement List.
|
HOW IS PRICING CALCULATED WHEN USING
OPTIONS AND ENHANCEMENTS?
At the time of invoicing, you can choose one predefined option and one predefined enhancement. The first step is to determine the quantity-based pricing level. For example, if the client is purchasing 10 - 5X7’s, and a pricing level is established for quantities 10 through 20, then all pricing would come from that pricing level. Next, the price for the option (for that price level) would be added to the price for the enhancement (for that price level), which would be added to the base price for the item (again for that price level). For example, an enhancement price of $3.50 would be added to an options price of $1.50, which would be added to the base price of $20.00, which would equal the new item price of $25.00. Finally, this new item price of $25.00 would be multiplied by the quantity of 10 to equal the extended price of $250.00. |
Click Modify my Costs to enter Information about the actual cost of an item – the amount you pay your vendor for this item. It looks and functions just like the Prices Mode. However, the amounts entered here are for the item’s actual cost, not the retail pricing. You can also enter the actual costs of options or enhancements. Cost information is used in profit analysis reports. The costs mode is not required unless you plan to use accounting profit reports. See the “Profit Analysis Report” section of the “Reports” chapter.
(available in ![]()
![]()
![]() )
)
You can use Spectra to track commissions on sales. Commissions can be earned by the booker (the user that books the session), the photographer, the assistant, and/or the sales rep. Commissions can be based on the product line or item.
For complete instructions on setting up Spectra to track and report commissions, refer to the "Employee Commissions" topic in the "Invoices" section of the user guide.
Open each item that is commissionable and then click the Commissions tab.
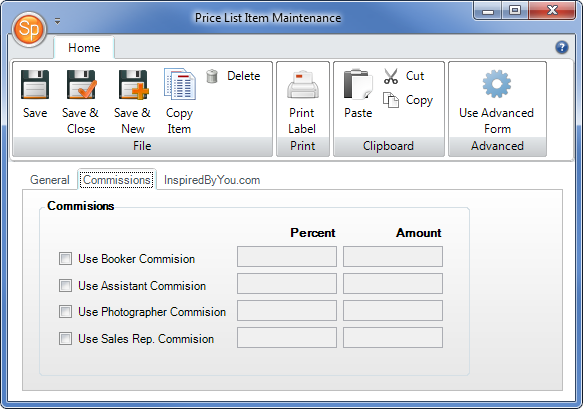
Price List Item Maintenance - Commissions Tab
Check the box for each employee type that can earn commissions on the product (i.e., booker, photographer, assistant, and sales rep).
Enter either a commission percentage or dollar amount.
|
ATTENTION!
Commission changes are not retroactive! Changes made to a price list item's Commissions tab do not alter previously created invoices. Changes will be applied to new invoices and to existing invoices that are modified. |
|
HERE'S A FLASH FOR YOU!
Tips for adding multiple price list items. If you've just installed Spectra, if you’re making changes to your price structure, or if you’re adding items, you may be entering a lot of price items! Here are some tips for entering item information quickly:
|
(available in ![]()
![]()
![]() )
)
On this tab you can set up additional information for your InSpiredByYou.com online items. These special item modifiers will be seen by your clients when they log into InSpiredByYou.com. You can add a product image and a special online item description.
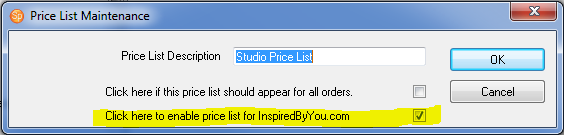
Open an item in a price list which has been set
up as an InspiredByYou price list. Note:
This option is selected on the Price
List maintenance window when
you create or modify a price list (shown here).
With the item open, go to the InSpiredByYou.com
tab of the Price List Item maintenance screen.
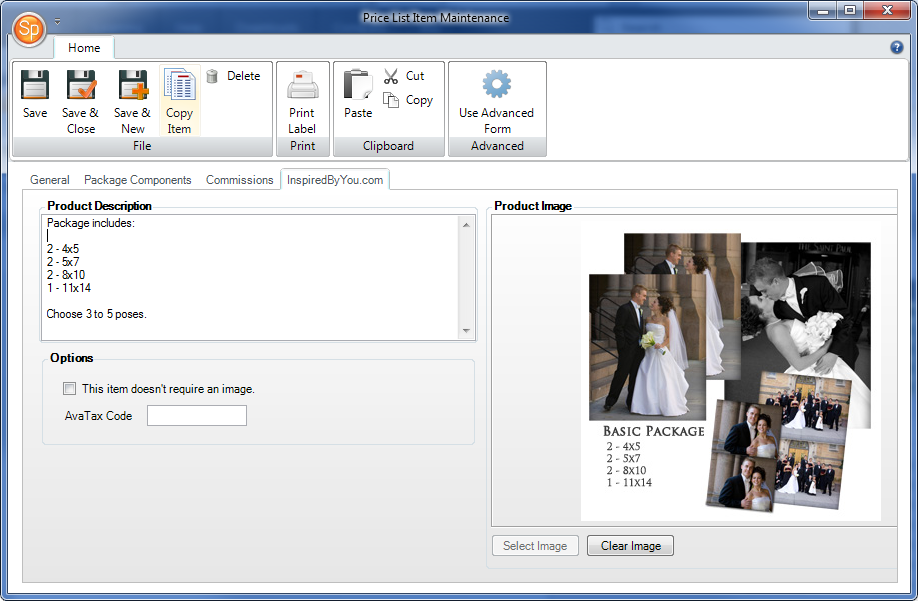
Price List Item Maintenance - InSpiredByYou.com Tab
Type an item description in the Product Description field.
Select an image to represent the product by clicking Select Image.
Check the option box if this item does not require the client to select an image. For example, an image CD would not require the client to select a pose.
Enter the AvaTax
Code for this item. The AvaTax
Service Method must also be enabled on the Sales
Tax tab in your InSpiredByYou
Preferences. Refer to the "Setting
Up InSpiredByYou" topic for more information. Note:
Avalara® AvaTax™ is a third-party tax calculator.
You must have an account with Avalara
to use AvaTax with InSpiredByYou.
(available in ![]()
![]()
![]()
![]()
![]() )
)
Spectra handles packages differently than the other items in your price list. When you select "Package" as the item type on the General tab, there will be additional options available on the General tab as well as a brand new Package Components tab.

Package Maintenance - General Tab
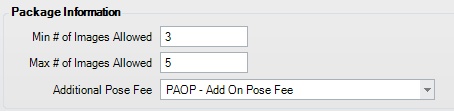
Number of Images Allowed - If the package requires a minimum and/or maximum number of poses to be selected when ordering, enter the Min # of Images Allowed and Max # of Images Allowed. When this package is added to an invoice, Spectra will warn you if not enough or too many poses have been selected based on these settings. Note: In addition to entering pose number requirements for each package, you must activate these validation options in the Invoice Image Options section of Studio Preferences > Digital.
Additional Pose Fee - If you limit the number of poses allowed in a package, you can set up your packages to automatically calculate add-on pose fees. First, set up an add-on pose fee item in the price list. Then open the package and enter the Maximum # of Images Allowed (above). Now, in the Additional Pose Fee Field, you can select the "Add-On Pose Fee" price list item from the drop-down list. During invoicing, Spectra will notify you and automatically add the pose fee to the invoice when you choose more than the maximum number of poses allowed in the package.
The Package Components tab is enabled when you select "Package" as the item type for the price list item being created. On the Package Components tab, simply select each item for the package from the drop-down list. Note: To create a package, each item in the package must already exist as an individual item in your price list. Choose the quantity of that item for this package. Any options or enhancements you have created for the individual item are also available in the package. You may select one option and one enhancement for each item.
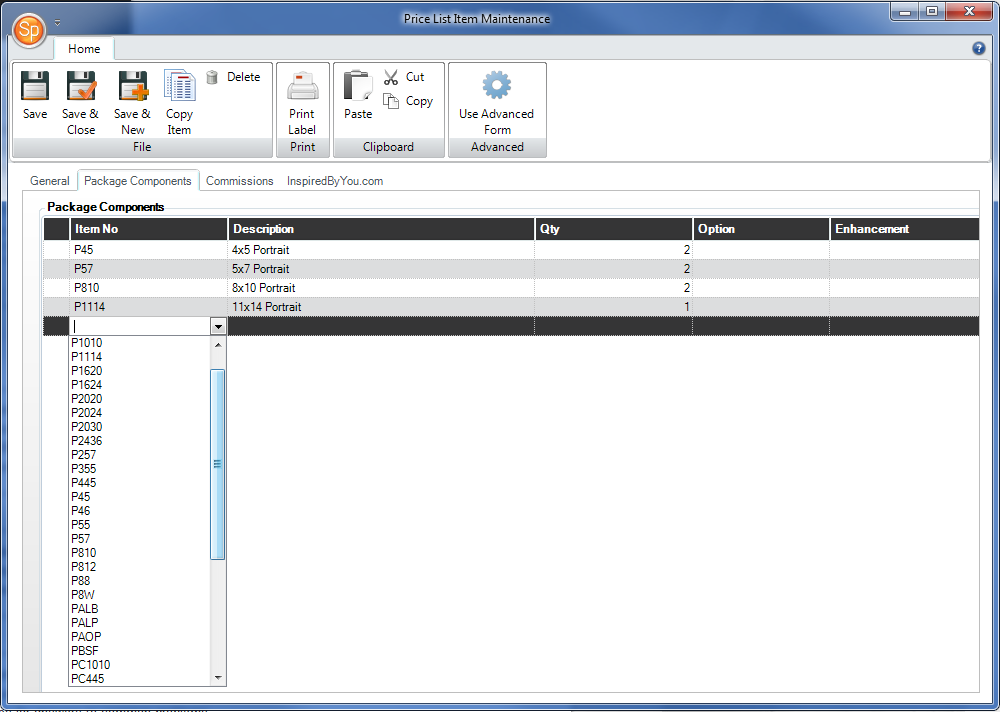
Package Maintenance - Package Components Tab
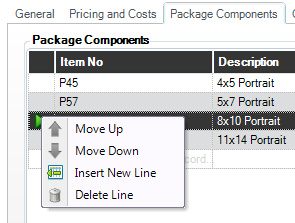
When you add a package to an invoice, the package components will be listed in the order they appear here. To rearrange the order, click on an item and then click the green arrow in front of the item for options that will allow you to rearrange your list.
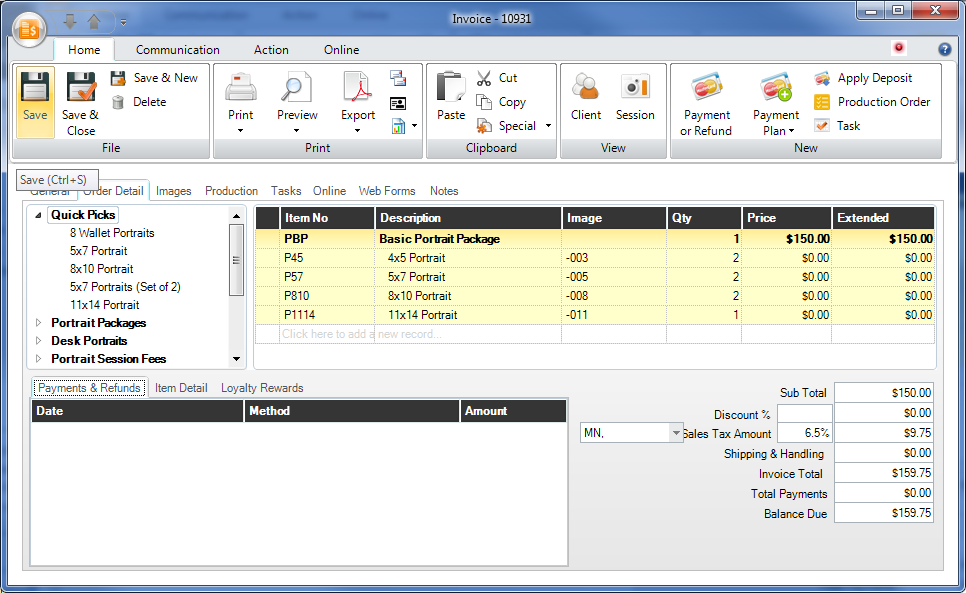
Packages will have a different appearance on a Spectra invoice. When you add a package to an invoice, the package will appear on the Invoice > Order Detail tab. There will be a header line containing the package description and price. This line will be bold and highlighted in yellow. Each package component will be appear on a separate line below with a price of $0.00. The component lines are highlighted in a light yellow and the description column is slightly indented.
If you have set the Min/Max # of Images Allowed for this package and enabled invoice pose validation on the Digital tab in Studio Preferences, Spectra will warn you not to save the invoice until you have selected the appropriate number of images for this package. See the "Working With Invoices" chapter for more information.
![]()