(available in ![]()
![]()
![]() )
)
The Bulk Scheduling Wizard is used to create sessions for a group of clients. The Bulk Scheduling Wizard will allow you to take a client group, filter, or organization and quickly schedule sessions for hundreds of clients. All of the sessions created have the same attributes of sessions created manually. The session numbering and session folder creation options selected in the Studio Preferences will apply to sessions created in the Bulk Scheduling Wizard as well.
Go to Tools > Bulk Scheduling Wizard. Click Next.
Select the group of client records that you wish to create sessions for. Select a client group, client filter, or organization and year.
Check the “Only include those clients without a future session booked” option if you want to exclude clients that already have sessions scheduled. Click Next
The Bulk Scheduling Wizard will tell how many clients you're about to create sessions for.
Enter in the session description, session type, photographer, assistant, camera room, and session status for the Bulk Schedule Wizard to assign to all of the new sessions. Click Next.
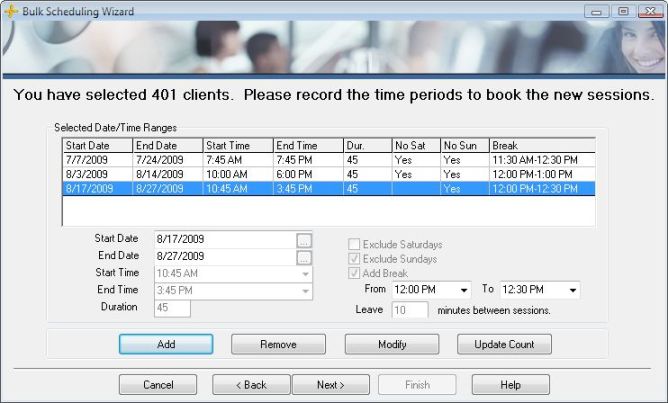
Bulk Scheduling Wizard
Now enter the time periods you want to book the new sessions in. Click Add and select the date, start time, end time, session duration. You can exclude Saturdays and Sundays and add a break during the day, and indicate how many minutes you want to leave between sessions. Click OK.
 |
HERE'S A FLASH FOR YOU!
The wizard will ignore any studio hours or lunch periods you have set for your calendar. The assumption is that you are scheduling for a special event and may want to use these times. Control any breaks you want by breaking up the time periods. |
Continue to enter as many time periods as you need to. Click Update Count to get a count of how many clients will be scheduled in the allotted time. Add more time entries to make sure everybody gets schedules. Click Next.
The Bulk Schedule Wizard is now ready to create your sessions. Click Finish to begin the scheduling process. If not all of the clients received a session, you will be prompted to return to the beginning of the wizard to schedule the rest of them.
![]()