(available in ![]()
![]()
![]()
![]() )
)
In this topic... Show
The Form Letter Builder allows you to create form letters to be used in mass mailings as well as bulk emails or text messages.
 |
PATHWAYS TO SUCCESS
How do you currently market to your customers? Do you know what your customers’ interests are? Do you tailor and personalize your marketing to each client? Using Spectra to its fullest potential can greatly help you increase your studio’s revenue. Give some thought to how you can utilize Spectra to more effectively market your products and services to your client base. |
Form Letters
From the Tools menu, choose Form Letter Builder.
Click Add.
Form Letter Properties
Enter a description of the form letter you are about to create.
Choose the Filter Type from the drop-down list. This will define the types of personalized information (merge fields) you will be able to include in the form letter. For example, if you want to send form letters that reference a family member of a client, choose the Clients with Family Members filter type.
Choose the user (it will default to the current user if left blank) from the drop-down list. Click OK.
Enter the Email Subject if this is going to be sent as an email.
Select the following email and contract options as desired:
Auto-Append Signature - Appends the user or company signature to the letter when sending as an email.
Auto-Attach...Invoice - Emails the invoice as a PDF attachment, or uploads a PDF of the invoice with a contract.
Auto-Attach...Image Detail Sheet - Sends the image detail sheet as a PDF email attachment.
Send as HTML - Retains any text formatting that has been used when emailing the letter.
Send as plain text - Emails the letter without any applied formatting.
Inactive - Mark a letter inactive to keep it from appearing in the various form letter drop-down lists throughout Spectra.
You can modify these settings after you've started editing your letter by going to File > Properties.
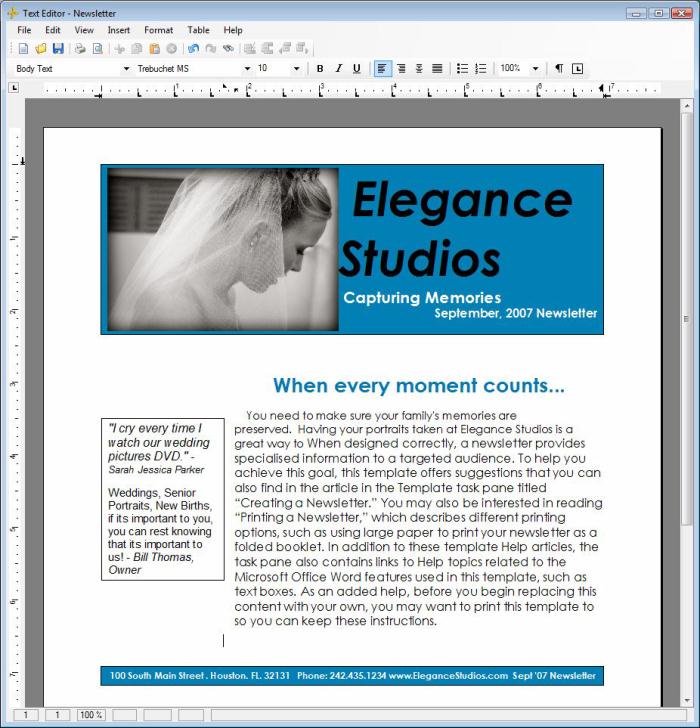
Once you have added a new form letter the Form Letter Text Editor will open. You can begin typing in the text of your form letter.

Form Letter Text Editor
The menu choices are File, Edit, View, Insert, Format, Table, and Help.
From the File menu you can create a New letter, Import a letter from Word, as well as Save, Export, Preview, and Print a letter.
New - Create a new form letter. This will open the New Form Letter screen.
Import - Import a letter that is saved in Microsoft Word. If you import a Word document you may have to adjust the formatting. You will also need to insert your merge fields.
Save - Save the changes you've made to the letter.
Export - Export the letter to a Word doc, PDF, text or HTML. Note: Exporting the letter from the Form Letter Editor will not merge any inserted fields.
Page Setup - Adjust the page setup, such as Paper Size, Source, Orientation, and Margins.
 |
HERE'S A FLASH FOR YOU!
Changing the Paper Size will allow you to easily create many different types of form letters. Create a form letter to print on envelopes, postcards, filing cards, or other types of paper. Studios in Europe and Australia can set the paper size to A4 for printing standard letters. |
Print Preview - See how the letter will print. Note: Previewing the form letter in the Form Letter Editor will not merge any inserted fields.
Print - Print the letter. Note: Printing from the Form Letter Editor will not merge any inserted fields.
 |
ATTENTION!
Printing, Exporting, or Previewing from the Form Letter Editor will not merge data into any inserted data fields. Print, email, or text the form letter from a client, appointment, session, or invoice record, or use the Communication Wizard to send the form letter to a group of clients. |
Properties - Change the letter properties, such as the Letter Description, Filter Type, Created By, or Email Subject.
Exit - Close the Form Letter Text Editor.
From the Edit menu you can Undo, Redo, Cut, Copy, Paste, Delete, Select All, Find, Replace, or Modify a Hyperlink.
From the View menu you can change the view.
Normal or Page Layout - Choose to view the form letter in either Normal view or Page Layout view.
Headers and Footers - Selecting the header and footer will allow you to type into the headers and footers. You can select Header or Footer to modify the header or footer for the entire letter, or select the First Page Header or First Page Footer to modify the header or footer for just the first page of the letter.
Bars - Choose to view or hide the toolbar, button bar, status bar, horizontal ruler, or vertical ruler.
Zoom - Zoom in or out on the letter. 100% is the actual size of the letter.
From the Insert menu you can insert different items into the letter.
Data Field
- Inserting a Data Field
will insert data from the record that you are printing, emailing,
or texting the letter from. The Data
Field options will differ
depending on the filter type of the form letter. For example,
client filter types can only
insert data from the client, while session
filter types can insert data from either the client or the session.
Note: You can insert company information
into any form letter.
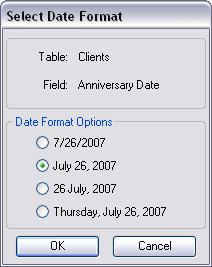
Inserting a Date - If you select
a Date Field
to insert (such as the anniversary date or the session date) you will
be prompted to select the Date
Format. You can choose MM/DD/YYYY, Month
DD, YYYY, DD Month,
YYYY, or Day of the Week,
Month DD, YYYY. To change the date format of a date field you've
already inserted, simply double-click the field in the form letter.

Select Date Format
Date - Inserting the date will insert a field that will always print Today's Date. In other words, it will insert the date you printed the letter or sent the email.
Image - You can insert an image into the form letter. Browse to the folder where the image is located, select the file type of the image and click Open.
Image Format - You may want to change the format of the image. You can click on the inserted image and use the cursor to resize the image. Or right-click on the image and choose Format Image.
Layout and Position - Select the desired Wrapping Style. In Line with Text will force the text to the top or the bottom of the image and the image will be in line with the text. Top and Bottom will force the text to the top and bottom but allows you to move the image anywhere. Square will allow text to the right and left of the image. Select the desired Position Style, Horizontal and Vertical Alignment.
Size and Distance - Adjust the size and position of the image. Using the scale to resize will ensure the image doesn't become distorted.
Saving Options - The saving options indicate if the image will be saved in the form letter or if the form letter will reference the image stored in a folder. The Embed data in document will save the image to the form letter in the database. Embed original file reference will reference the file from its original location but will not save the image in the database. Export image and embed file reference will export a previously embedded image to a folder and save the file reference. If you are embedding the data in the document choose the saving options.
 |
ATTENTION!
Saving the image using the Embed data in document option will save the image in the Spectra database. Saving images to the Spectra database may significantly increase the size of your database. If you use images in your form letters it is our recommendation to use the Embed original file reference option. |
 |
ATTENTION!
If you use Spectra on your network, saving images using the Embed original file reference or the Export image and embed file reference options need to be referencing the image in a mapped network drive that is mapped on all of your workstations. If it is not, the image may not print in the form letter when printing from other workstations. We recommend first saving the image in the mapped network drive and then inserting the image into the form letter, choosing the Embed original file reference as the save option. |
Text Frame - A text frame is a box that you can use for text or data fields. To format the text frame you can resize it using the mouse, or hover over the edge of the text frame, then right-click and choose Format Text Frame. In the Text Frame Attributes window you can set the layout and position, as well as the size and distance. Also, set the frame and color options for the background color, frame line, and internal margin.
Hyperlink - Inserting a Hyperlink allows you to insert a link to an external page or file.
Page Break - Insert a Page Break to start a new page in the letter.
From the Format menu you can select formatting options for the various elements of your letter.
Character - Change the Font Style, Size, Attributes, Position and, Color.
Paragraph - Change the Formatting and Indents and place Frames around paragraphs.
Tab - Adjust the location of tabs.
Bullets and Numbering - Select Bullets and Numbering to create bulleted or numbered lists.
Styles - Create and save formatting styles that you can use repeatedly.
Header and Footer - Format the position of the headers and footers.
Image - If you have an image selected this will open the Image Attributes window.
Text Frame - If you have a text frame selected this will open the Text Frame Attribute window.
Text Color - Change the color of the selected text.
Text Background Color - Change the color of the selected text's background.
Document Background Color - Change the color of the document's background.
From the Table menu you can insert and format a data table. A data table is like a mini-spreadsheet, with rows and columns.
From the Spectra Tools menu, choose Form Letter Builder.
Click on the form letter you want to modify.
Click Modify.
Make your modifications to the form letter.
Save your form letter.
From the Spectra Tools menu, choose Form Letter Builder.
Click on the form letter you want to delete.
Click Delete.
 |
HERE'S A FLASH FOR YOU!
With the release of Spectra 2012, the process for printing a form letter has been incorporated into the new Communication Wizard. Please refer to that topic if you're using Spectra 2012 or greater. The following instructions for printing a group of letters apply to versions of StudioPlus Spectra prior to 2012. |
From the Spectra Tools menu, choose Form Letter Builder.
Click on the form letter you want to print.
Click Merge & Print.
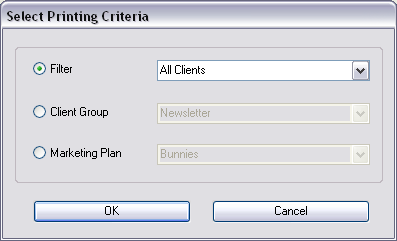
Select the Filter, Client Group, or Marketing Plan that you want to print the form letter for. This will define your mailing group. See the next section on building filters to learn how! Note: Only Client Filter Type Form Letters can be printed using Client Groups or Marketing Plans.

Print Form Letter Filter Selection
 |
HERE'S A FLASH FOR YOU!
Form letters can also be printed for a single client from the Communication tab on either the client, session, or invoice record. |
|
HERE'S A FLASH FOR YOU! With the release of Spectra 2012, the process for previewing a form letter has been incorporated into the new Communication Wizard. Please refer to that topic if you're using Spectra 2012 or greater. The following instructions for previewing a form letter apply to versions of StudioPlus Spectra prior to 2012. |
From the Spectra Tools menu, choose Form Letter Builder.
Click on the form letter you want to preview or export.
Click Merge & Preview.
Select the Filter, Client Group, or Marketing Plan that you want to print the form letter for. This will define your mailing group. See the next section on building filters to learn how! Note: Only Client Filter Type Form Letters can be printed using Client Groups or Marketing Plans.

Print Form Letter Filter Selection
The Text Editor will open, with each form letter starting on a new page. Modify any text you desire, then go to the File menu and choose Print to print the letters, or Export to save the letters to a PDF or Word Document.
 |
HERE'S A FLASH FOR YOU! Form letters can also be previewed and exported for a single client from the Communication tab on either a client, session, or invoice record.. |
Form letters are great ways to get in touch with clients or prospective clients, on an individual basis. By creating a specific filter and form letter for a target group, your marketing becomes more effective.
The following is an example of a form letter confirming an upcoming session:
Elegance Studios
300 N. Main Street
Jacksonville, MN 55630
Phone: (612) 636-6000
Fax: (612) 636-6060
Email: BobR@EleganceStudios.com
Melissa Meyer
1679 Holly Lane
Edina, MN 55349
March 4, 2012
Dear Melissa,
Thank you for scheduling your engagement session with us! According to our records, your session is scheduled for July 12, 2012 at 3:00 PM. Please see the attached session confirmation for important information regarding your session. We've also included a brochure with details about our various products and services.
We look forward to seeing you on July 12, 2012. If you need to reschedule your session, please let us know 24 hours in advance.
Sincerely,
Bob Robertson
Owner