(available in ![]()
![]()
![]()
![]() )
)
The loyalty program allows you to automatically reward clients for their return business. You can also manually issue loyalty rewards like a studio credit to help with customer service issues or other times when you just want to give clients incentive to come back and purchase more.
Note: Before using the Process Loyalty Rewards tool to automatically create rewards, be sure to set up the following items in Spectra:
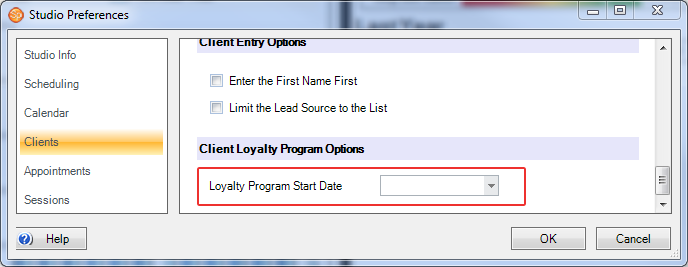
When processing (creating) loyalty rewards, Spectra will use qualifying sales that have occurred since the start date of your loyalty program.
Go to Maintenance > Preferences > Studio Preferences.
Scroll to the bottom of the Clients page and select a program start date.
Go to Maintenance > Clients > Client Statuses.
Click Add
to create a new status, or select an existing status and click Modify.
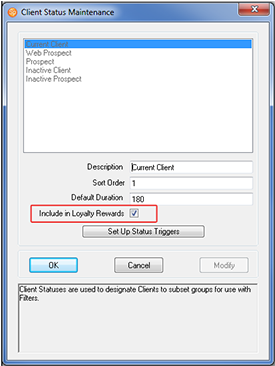
Check the Include in Loyalty Rewards box.
Click OK.
Now select this client status for each client you wish to include in your loyalty program.
Note: You can manually create rewards for clients with any status, but only those clients with a loyalty-enabled status will be included when using the Process Loyalty Rewards tool to create rewards.
Use Spectra's Process Loyalty Rewards tool to create loyalty rewards based on your clients' historical sales. See the topic on Processing Loyalty Rewards for more information.
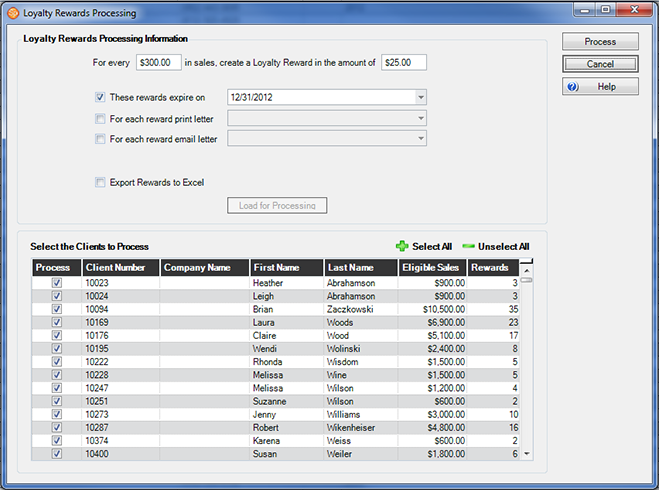
Process Loyalty Rewards Tool
Let's say you had someone do you a favor in the studio, but they don't want to be paid for their efforts. You could offer them a loyalty reward that serves two purposes – paying them back and encouraging future sales. Loyalty rewards can be used a little like gift certificates, but you don't have to sell them on an invoice.
Open the client record and go to the Summary tab.
On the Summary tab click on the Loyalty Rewards tab.
Click on the green plus sign to add a new reward.
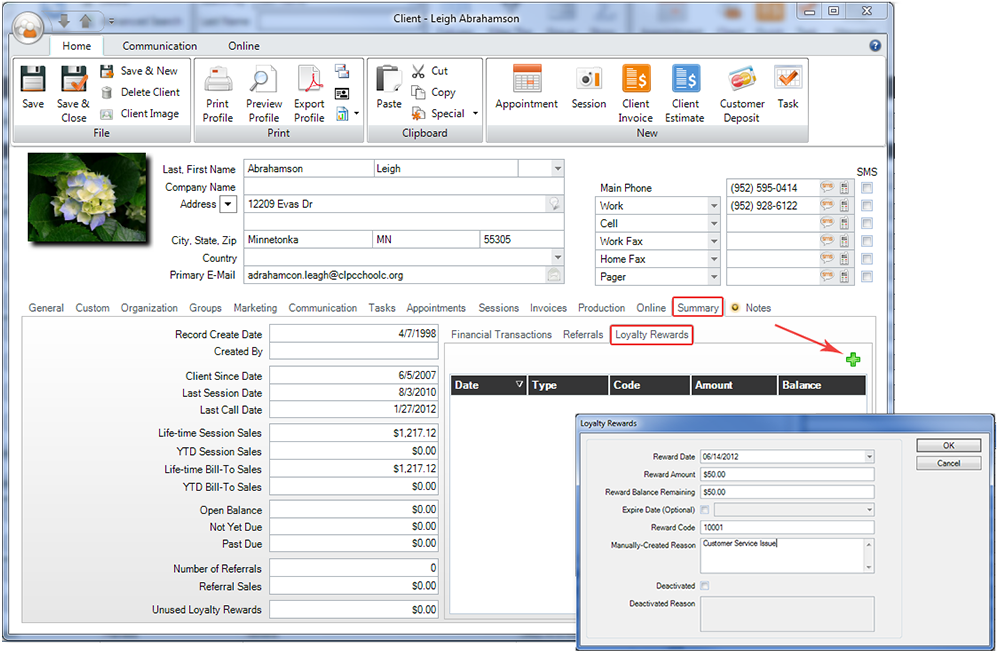
Note: Rewards created manually do not assign a loyalty-enabled status to the client (required for automatically assigning future rewards). If you want to manage this client using statuses, you will need to assign them at this point. You may want to have a different status for manually created rewards.
Here are some ways you can track your clients with loyalty rewards:
You can track your clients with loyalty rewards by using the Clients hub and adding columns using the column chooser.
Because the automatic processing of loyalty rewards requires that clients be assigned to a loyalty-enabled status, you can also choose Client Status in the Search by box on the Clients hub.
The client Summary
tab not only includes details of each reward, but also reward totals.
![]()
Loyalty Rewards on the Client Summary Tab
You can set up triggers on your client status(es) to automatically send out emails or print letters to clients who are awarded loyalty rewards or whose rewards will soon be expiring.
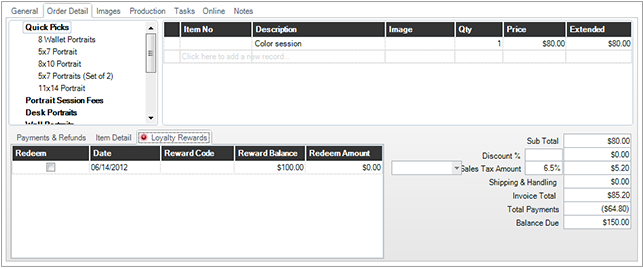
Loyalty Rewards on the Invoice Order Tab
When a client comes in to settle an invoice and wants to use a loyalty reward, go to the Orders tab of the invoice and click on the Loyalty Rewards tab in the lower-left corner by the Payments & Refunds. A red notification light even lets you know when there are redeemable rewards available. Select one or more rewards to use on this invoice by checking the boxes in the Redeem column. A new Loyalty Rewards field will show in the totals to the right.
You can open individual rewards from the Summary tab of the client record by double-clicking on a listed reward.
A redeemed reward will open the invoice it was used on.
An unused reward will show a detail screen where you can make changes to the reward.