(available in ![]()
![]()
![]()
![]()
![]() )
)
The first step in the Digital Workflow is to capture your images and create preview files to be used in Spectra. Depending on how you shoot your images there are a number of different options.
In this topic... Show
If you use a card reader to bring your images over or if you create hi-res JPEGS from your raw folders, you can use the Import Images button. Highlight the session from the Session Display and click Import Images.
The Import Images button will allow you to copy the images off your card, create previews or low-res JPEG images for presentation in Spectra, and create an archive CD of your images, all through one process.
First select the source of the images. This will automatically be the last folder or drive you used (so if you use a card reader, it will always point to the card reader drive). You will see the image in the Image Preview screen.
Select if you're going to Copy Images, Create Previews, and/or Archive Images.
Use the magnify button to zoom in on the image, use the exclude button to exclude this image from the import, and the previous and next buttons to navigate through the images.
Copy images if the images are on a memory card. Spectra will copy the images to the hi-res folder (if they are JPEGS or TIFFS) and/or the raw folder (if they are proprietary camera raw files).
Select the image file types that you want to copy into the raw and hi-res folder if you have more than one type of file in the folder you are copying from. You can batch rename the files as you copy them over.
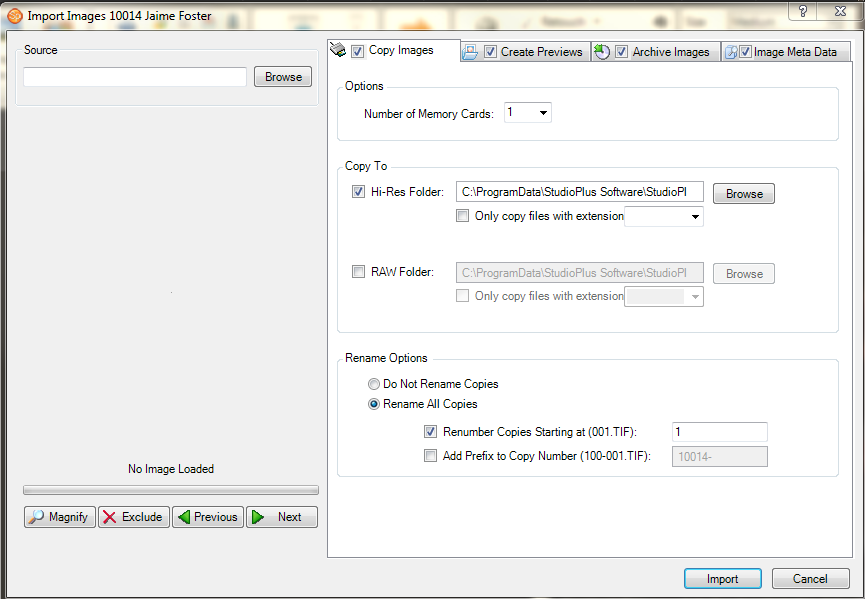
Import Images - Copy Images Tab
Click on the Create Previews tab to create previews of your images. This will create smaller JPEG files of your hi-res images and save them to the preview subfolder (e.g. S:\Images\Previews\).
If you have copied images to your hi-res folder it will create previews from these files. If you did not copy images to the hi-res folder, Spectra will use images from the raw folder (the raw file(s) must be a supported raw in order for Spectra to be able to create the preview JPEG). If you did not copy images it will create previews from the source file.

The Import Images screen - Create Previews Tab
Set Resize Previews to a maximum pixel count of to 1000 pixels. You may choose to increase the pixel size of the preview images up to 1200 pixels depending on your screen resolution.
Set the JPEG Compression Quality to 90-100 and DPI to 72. The only time you should increase the DPI to higher than 72 is if you want to print higher quality proof or contact sheets from Spectra. In that case do not increase the DPI above 150.
Click the Archive Images tab if you also want to have Spectra automatically create an archive of the images upon copying and creating the previews.
Select the files to include, Hi-Res, Raw and/or Previews.
Select if you want a summary text file included in the archive. This is a text file with the client and session information.
If you want to burn an archive CD select Archive to CD/DVD and insert your blank CD and prepare for writing, if necessary. You can also write multiple sessions to one CD. So if you have a disk that you had previously archived to, insert it instead.
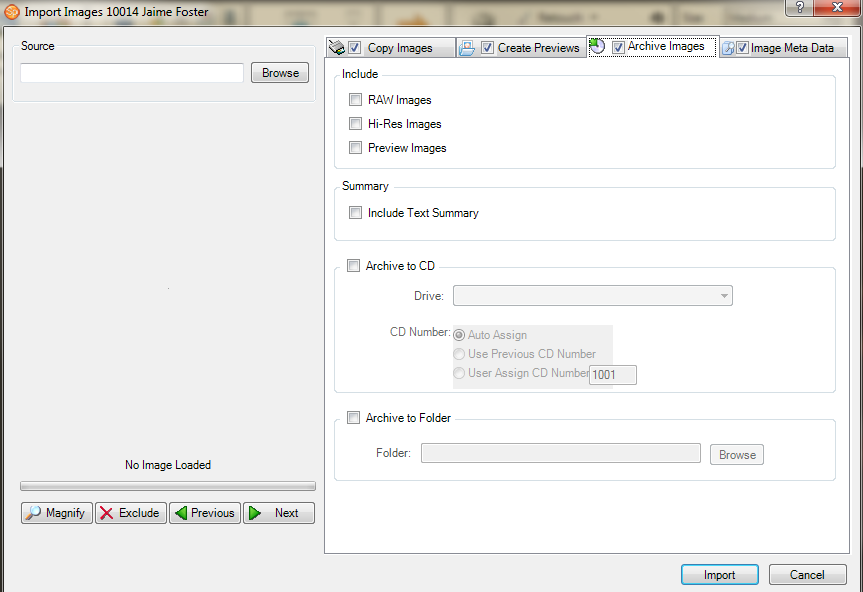
Import Images - Archive CD Tab
Assign the CD number and select the CD drive.
If you want to archive images to a different directory on your network, select Archive to Folder.
Select the folder on your network.
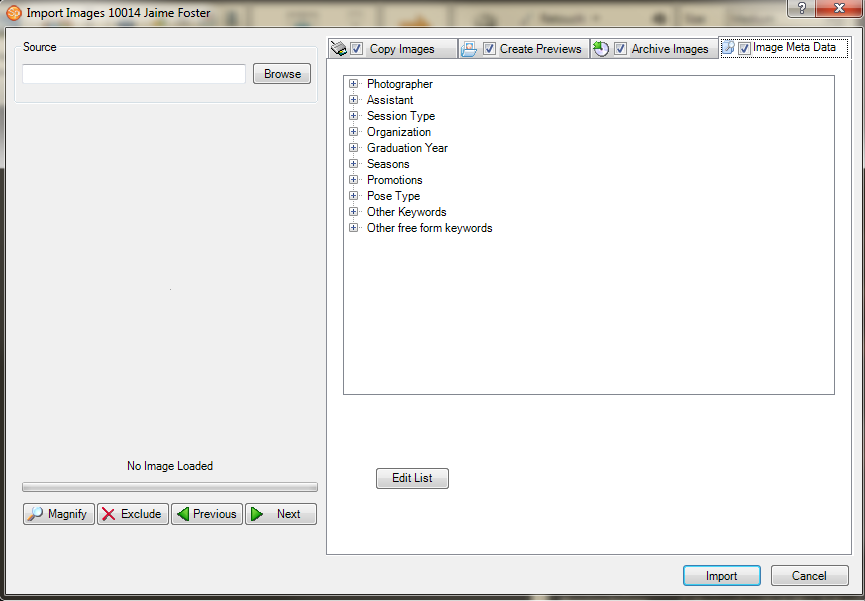
Import Images - Meta Data Tab
Open the Metadata tab if you want metadata keywords to be added to the images as they are captured. The metadata is only added to the preview file's keyword property. There are a number of pre-set values, such as Photographer, Assistant, Session Type, Organization and Graduation Year, or you can create your own properties.
Click Edit List to edit your metadata options. Then click Add New Category to create a new category. Click on the new item and type in the name. Then click Add New Item to create the keywords for this category. The categories can allow multiple items, or it can be set to only accept one, by setting the Allow Multi Select option.
Once you have selected your settings in the Copy Images, Create Previews, Archive and Metadata screens, click Import Images.
The images will now be associated with this session. You will be prompted to Update Session Status.
The Digital Workflow hub will be refreshed to show your images. Right-click on an image to rotate it or delete it. Use the Ctrl and Shift keys to select multiple images.
See the Capture One section of the Working with Integrated Software chapter.
You can launch your capture software from Spectra.
First, go to Maintenance > Preferences > Workstation Preferences > Miscellaneous tab and under Digital Applications select your capture software (see the Workstation Preferences chapter for more information).
From the Capture Images stage of the Digital Workflow screen, click the Capture Images button.
From your capture software, import your digital images. Make sure to place your developed hi-res images in the hi-res subfolder of the folder for this session that has been created in your studio's images folder (e.g., S:\Images\10001\HiRes\ ). The hi-res files must be standard TIFF or JPEG files.
If your camera produces a proprietary raw file, place those raw files in your raw images subfolder (e.g. S:\Images\10001\Raw\).
Convert your raw images to JPEGs. If they're high resolution, save them to the hi-res subfolder. If they are low resolution, save them to the previews subfolder for that session.
If you want Spectra to create the low-res previews,
click Process Images  from the Capture
screen toolbar and Create
Previews.
from the Capture
screen toolbar and Create
Previews.
Now that you have captured the images for this session, go to Session Status Maintenance, and click Session Status to change the status for this session.
(available in ![]()
![]()
![]() )
)
The purpose of the Group Capture feature is to rapidly associate images with Spectra data and process those images to save you countless hours of manual processing. The feature is designed to be used when shooting a large number of people, such as a school, dance, or other organization. However, the feature can also be used when shooting just one client at a time. Refer to the "Group Capture" topic for more information.
![]()