(available in ![]()
![]()
![]()
![]()
![]() )
)
In this topic... Show
The Invoice record is used to store all the invoice information and to display payment information regarding the invoice. Invoice information includes invoice number, date, type, sales rep, due date, detailed sales information, payment information, digital image selection, sales presentation, slideshows, and open balance information.
Use the invoice record to quickly and efficiently generate an invoice for a client while the client is either in your studio or on the phone. After the client leaves (or after the call), you'll be able to enter a detailed production order for your lab and/or other vendors. This process allows you to invoice the client quickly and receive payment immediately, without delaying the client while the production details are entered. After an invoice has been generated, a payment can be applied to the invoice by clicking Payment or Refund in the New group on the ribbon. Invoices can easily be turned into a credit memo by changing the invoice type. Refunds can then be issued from the credit memo.
 |
HERE'S A FLASH FOR YOU!
The Sales Presentation is a wonderful tool to present images to clients and capture their digital order. Whether you're a film or digital studio, you can utilize these features to enhance your selling process and close additional sales. If you have digital image files of your sessions, acquire them into Spectra and start showing dynamic, effective presentations today. (For information on acquiring your images, see the "Working with Digital Imaging" section.) |
Invoice Record
|
WHAT HAPPENED TO THE FILE MENU? A lot of it is distributed in the Ribbon now for greater ease of use. |
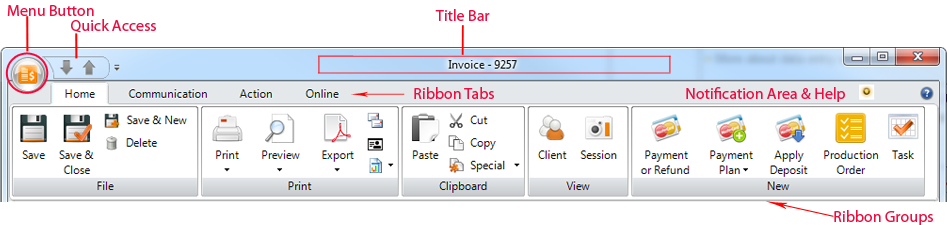
Menu Button - The Menu button will contain an icon based on the type of record it is. For the invoice record, it displays an orange invoice icon. Click the icon to see menu choices such as: Save, Save & Close, Save & New, Delete, Unlock Posted Invoice, Transfer Credit Balance, Payment Methods, Create Credit Memo, and Close Form. There may be additional choices depending on some of the optional components of Spectra.
Quick Access Bar - If you opened the invoice from a hub, there will be gray arrows to select the next or previous record in the list.
Title Bar - Once a record has been saved, it will show "Invoice - " followed by the number of the invoice.
Notification Area and Help Button - Just under the title bar to the far right, you will see flashing notification lights if there is something about the invoice that warrants special attention. Click Help to get online help for this window.
If you're not sure what a certain button is for, hold your cursor over the button and wait for a tool tip to be displayed.
Contains the File, Print, Clipboard, View, and New groups. Note: There may be additional groups added when other components of Spectra are activated.
Save - Save the current invoice.
Save & Close - Save the invoice and close the invoice window.
Save & New - Save the record and open a new, blank invoice record.
Delete - Delete the open invoice record. Note: This will delete any payments or production orders PERMANENTLY. An invoice with a posted payment cannot be deleted until you also unlock and un-apply the payment.
Print - Print the invoice and image detail sheet, just the invoice, just the invoice image detail sheet, or just the contact sheet.
Preview - Preview the invoice and image detail sheet, just the invoice, or just the invoice image detail sheet before printing.
Export profile - Export the invoice and image detail sheet, just the invoice, or just the invoice image detail sheet as an Adobe PDF. You can also choose other electronic formats like text, rich text, Excel file, or even HTML.
Mailing Label - Print a mailing label showing the client's name, address, and other information as defined in Printing Preferences.
Account Label - Print a file label with the client's name, address, phone number, client number, and other information as defined in Printing Preferences.
|
HERE'S A FLASH FOR YOU!
If you want more options for printing a single label, go to Printing Preferences, and set the single mailing label to prompt for printer. There is also an option to use a Dymo Label Printer in Workstation Preferences > Miscellaneous. |
Custom Reports - If you have imported a custom report that can be used from a client record, you can print, preview, or export it to PDF with this button. See the section on Custom Reports for more information on what kind of reports can be used with clients.
You can Paste information that you copied or cut from another location or program into a single field. You can also Cut or Copy text from a single field for use elsewhere.
Special Copy - Copy the text (in label format) that would print onto a mailing label or account label to paste into another field or program.
Client - View the session client associated with this invoice.
Payment or Refund - To add a new payment or refund, choose New Payment or Refund from the New group. See the "Working With Payments and Refunds" chapter for more information.
Payment Plan - Create a new payment plan for this invoice. This will help you create a set of future payments automatically calculated for a certain time period. See the "Payment Plans" topic for more information.
Apply Deposit - Use this option to apply a customer deposit previously saved to their client record. You can apply more than one if necessary. If there is a surplus, it can be transferred to another invoice. If an invoice is saved with a negative balance, there will be a choice on the Spectra menu to Transfer Credit Balance to another invoice. You can choose an invoice from the same client or from any other client.
(available in ![]()
![]()
![]()
![]() )
)
Production Order - Use this feature to create a new production order for this invoice. See the section "Working with Production Orders" for more information.
Task - Create a new task related to this invoice
New Call - By default, a new call record will be created and have it's due date set to today, but no completed date is set. You can use the call today or change the due date in the future.
Completed Call - Creates a call record that has both the due and completed date set to today.
Dial Phone - If you have a TAPI-compliant phone system connected to this computer, you can use this button to have Spectra automatically dial any of the client's phone numbers.
(available in ![]()
![]()
![]()
![]() )
)
New SMS Text - Use this command to create a new SMS text message or to merge the client, session, and invoice information into a form letter or custom report and send it as a text message.
New Email - Use this command to merge the client, session, and invoice information into a form letter or custom report and automatically attach it to an email that can be sent directly to the client. To send a client email, the client's record must contain an email address and outgoing email must be set up on the computer you are working on. For more details on setting up outgoing email, go to Workstation Preferences > Email.
Completed Email - Use this form to record details from a client email that you sent or received outside of Spectra for future reference.
Print Letter - Use this button to select and print a pre-created form letter.
Preview Letter - Preview a form letter to view/modify the text before you print it.
Export Letter - Export the letter as an Adobe PDF. You can also choose other electronic formats like text, rich text, Excel file, or even HTML formats.
Mailing Label - Print a mailing label showing the client's name, address, and other information as defined in Printing Preferences.
Account Label - Print a file label with the client's name, address, phone number, client number, and other information as defined in Printing Preferences.
Special Copy - Copy the text (in label format) that would print onto a mailing label or account label to paste into another field or program.
View All - Show all notes related to the invoice, including session notes, client notes, etc.
Upload Contract - Upload a contract to InSpiredByYou.com.
View Contract - View an existing contract.
Cancel Contract - Cancel a contract.
Import Images - Combines copying images, creating previews, archiving, and adding metadata into one convenient process. See the "Capture Images" section of the "Working with Digital Imaging" chapter for more information.
Render Ordered Images - Takes the hi-res images, applies any changes made during the import process or during your sales presentation preparation, and creates new images from those settings. See the "Render Images" section in the "Sales Presentation" topic of Digital Workflow.
(available in ![]()
![]()
![]()
![]() )
)
Render Proof Images - Create a set of proof files for proofing. See the "Render Images" section in the "Sales Presentation" topic of Digital Workflow.
(available in ![]()
![]()
![]()
![]() )
)
Send Images to Lab - See Send Images to Lab.
Archive Images - See Archive Images.
Delete Images - See Delete Images.
Start Presentation - Start a sales presentation.
Start Slideshow - Start the slideshow.
Change Slideshow Settings - Modify your custom settings before starting a slideshow.
If your studio has a HoldMyMemories account and your studio information has been entered in the HoldMyMemories.com Preferences, you can use the tools in this group to manage the client's HoldMyMemories.com account.
Create Account - Create a new HoldMyMemories account for the client. This will open a window containing the client information you already have in Spectra to establish an account with HoldMyMemories.com. For more information see the topic on HoldMyMemories.com.
Upgrade Account - If the client already has a HoldMyMemories account but wants to upgrade to another level, use this tool to make the changes.
View Site - View the client's HoldMyMemories.com site.
Upload Images - Upload images from a Spectra session to this client's HoldMyMemories.com site.
If your studio has an InSpiredByYou.com account and you have set up your InSpiredByYou.com Preferences, you can use tools in this group to manage the client's InSpired account information. See the chapter on InSpiredByYou.com for more information.
Reset Login - If the client has changed their default password and then forgotten it, use this button to reset it. You won't be able to see the password they selected, but this will reset the password back to their last name (default).
View Site - View the client's InSpiredByYou.com site.
Extend Expiration Date - If you have a InSpiredByYou.com account and this session has been uploaded to the site, click Extend Expiration Date to extend (or shorten) the web expiration date. Simply choose the desired date and click OK. Another window will open to let you know whether or not the change was successfully synced to the website. If you want to take the session down, set the expire date to today. The session will then show up on your Home page as a session ready to expire.
Upload Images - Upload images from this session to InSpiredByYou.com.
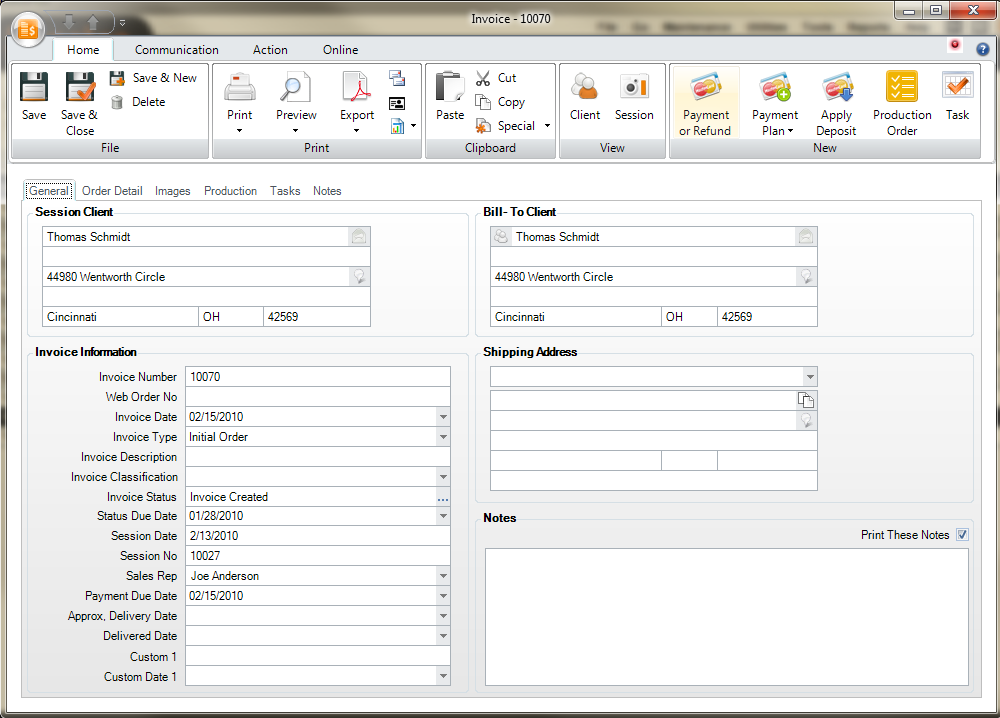
This is where the invoice details are located. Each tab holds corresponding information about the invoice.
This is where client-specific information, invoice information, and notes about the invoice are located.
Session Client - This is the client in whose name the session was booked. This field cannot be modified without changing the session.
Bill-To Client - This is the name of the person being billed for the session. The default bill-to client is the session client. However, if you wish to change the bill-to client, click the client icon for additional bill-to options.
Change Bill-To Client - Opens a search window so you can select another client from your database.
Select the criteria or field which you will search by for the bill-to client. For example, to search by last name, press the down arrow and select Client-Last Name from the list.
Type the selection criteria, press Enter, and click Search. For example, to search for clients with the last name Anderson, you would type "Anderson" in this window. To broaden your search criteria, type only part of the selection criteria. For example, typing "And" in this window would give you anyone whose last name begins with "And." If you're using the Enterprise version of Spectra, you can choose to search all the studios in the enterprise by checking that option, if available. (Note: This option may not be available to all Enterprise users.)
The clients who match your criteria will be displayed. Select the desired client by clicking. Click OK to have that client appear as the bill-to client.
View Bill-To Client - You may view the bill-to client's information by clicking View Bill-To Client.
Create New Bill-To Client - Will open a new client record or run the New Client Wizard depending on your user settings.
Use Google Maps![]() to view the address location for the session client
or the bill-to client.
to view the address location for the session client
or the bill-to client.
Invoice Number - The invoice number is a unique number assigned by Spectra when the invoice is created and cannot be modified.
|
HERE'S A FLASH FOR YOU! An invoice number is created once the invoice is saved. Once a number is assigned it will not be used again, even if the invoice is later deleted. |
Web Order No. - If this order was downloaded from InSpiredByYou.com, this invoice will be given a web order number automatically matching the client's online order confirmation number.
|
HERE'S A FLASH FOR YOU!
To easily locate a client's InSpiredByYou order, use their confirmation number. The client's InSpiredByYou order confirmation number is stored as the Web Order Number in Spectra. So just search the Invoices hub by web order number! |
Invoice Date - The invoice date is the date the invoice was created. Spectra enters this date automatically.
Invoice Type - The invoice type is a description of what the invoice is for. The invoice types are: Session Fees, Initial Order, Re-order, Estimate, Generic, or Credit Memo.
|
HERE'S A FLASH FOR YOU!
What do the different invoice types mean?
|
Invoice Description - Include a short description of what this invoice is for.
Invoice Classification - Spectra's invoice types cannot be changed because they each have specific functionality as described above. If you want to have your own classifications, you can choose them here. Create your own classifications in Maintenance > Invoice > Invoice Classifications.
Invoice Status - If you want to track your invoices based on additional criteria, create invoice statuses in Maintenance > Invoice > Invoice Statuses. You can then select the status for this invoice from the drop-down list. You can sort the Invoices hub based on these statuses, or use a filter based on invoice statuses to create reports.
Status Due Date - This date is based on the duration set up in your invoice triggers. For example, if you typically have a 30-day billing on your invoices, you can have a trigger that generates a phone call after 30 days to remind the customer of a payment. For more information on how to set up triggers, see Triggers.
Session Date - The session date is the date of the actual photography session. The date is automatically supplied by Spectra if you're creating the invoice from a session and cannot be modified by the user. If you're creating a client-based invoice (an invoice that is not linked to a session), this field is blank.
Session No. - If this is a session-based invoice, the session number will be listed here.
Sales Rep - The sales rep is the individual that created the invoice. You can choose the sales rep from the drop-down list.
Payment Due Date - The due date is the date that the invoice is due. You may click on the arrow to select the due date from the calendar, or simply type it in. When typing in the due date, you do not need to enter slashes. For example, 010112 would appear as 01/01/2012.
Approximate Delivery Date - (Optional) Use the down arrow to select the delivery date from the calendar or enter it manually.
Delivered Date - (Optional) You may use the calendar or type the date in manually. If desired, you may set your invoice posting preferences to post only those invoices that have this date filled in, meaning that the order has been delivered.
Custom Fields - You have one short text field and one date field.
Shipping Address - Click the drop-down to choose the session client, the bill-to client, or the studio as the location to ship to.
Notes - The notes section is a memo field that you can use to enter any information regarding the invoice that is needed. Check the Print These Notes box if you want this field to appear on the printed invoice.
The Order Detail tab is where the items, payments, and refunds for this invoice are listed.
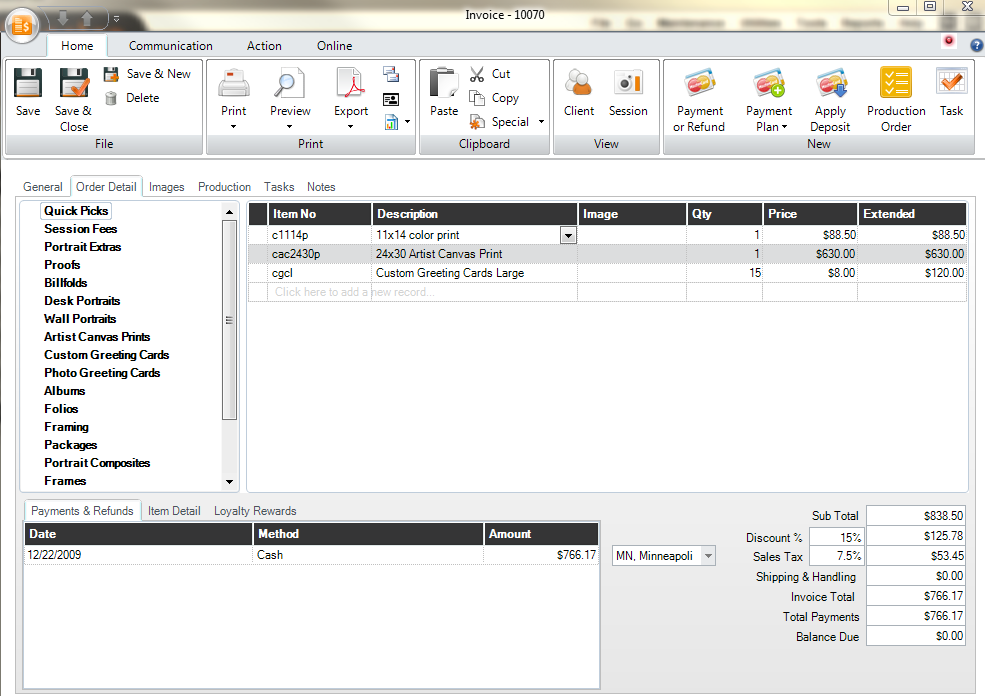
Invoice Order Detail
Item Selection Window - This is a list of all the invoice items available for this session type. If the invoice is not linked to a session, then the items shown are based on the default price list for client invoices that has been set up in the Studio Preferences > Invoicing.
|
HERE'S A FLASH FOR YOU!
You create your item lists and prices in the Maintenance > Price List section of the program. See the "Working With Price Lists" section of this manual to learn how to set up items and price lists. |
Invoice Detail - This section lists each item on the invoice, a description of the item, the quantity, the unit price, and the extended price. Items can be selected in three different ways.
Double-click the item from Item Selection window.
Enter the item number in the Item field and press Tab.
Or, enter a special item that has not been pre-defined in the price list by simply entering a description in the description column, no item number is necessary. A quantity and price can be entered.
The orange arrow to the left of the line shows which item is currently selected. Click the orange arrow (make sure the arrow verifies that the desired line is selected) and choose to View the Item Detail, Add Item to Package above the selected line, Move the line up or down on the invoice, or Delete the line.
Payments and Refunds Tab - This is where you can get a quick glance at the payment history of this particular invoice. The list will include the date the payment or refund was made, the method of payment, and the amount paid. It will also list any future payments that have been planned, but not processed. Double-click on any payment or refund in this area to bring up the payment screen. See the "Features of Payment/Refund Records" topic for more details.
 |
ATTENTION!
A payment/refund CANNOT be modified or deleted after it has been posted. See the "Working with Accounting Features" topic for more information on posting. |
Item Detail Tab - Another way to show or select the item details as you click through the invoice lines in the grid.
Loyalty Rewards Tab - This list will show any redeemable loyalty rewards that can be used on this invoice. When there is an unpaid total on the invoice you can simply put a check in the Redeem column to apply the reward. If the invoice is less than the reward, the redeemed amount will be shown, along with any remaining balance in the Reward Balance column.
(available in ![]()
![]()
![]()
![]() )
)
Charges and Totals Section - This is where the invoice summary information is located.
Subtotal - The subtotal lists the total of all of the items listed in the Invoice Detail section.
Discount % and Discount Amount - To discount the entire order by a fixed percentage, enter the percentage (e.g., 10% is entered as 10) in the box to the left of the discount amount line. The amount of the discount is automatically calculated and displayed.
Loyalty Rewards - This field will only be visible if a reward is redeemed on this invoice.
(available in ![]()
![]()
![]()
![]() )
)
Sale Tax Rate - The sales tax rate applies the appropriate sales tax to the item based on how the sales tax tables were set up in Studio Preferences. (See the Invoicing tab of Studio Preferences further details.) Sales tax is not applied to non-taxable items. Sales tax is applied after the discount is subtracted from the subtotal. You can select a sales tax rate from the drop-down list.
Sales Tax Amount - This is the total tax applied to the items of this invoice, automatically calculated by Spectra. It's recommended that you create an exempt rate of 0% in the tax table for tax-exempt orders.
Shipping & Handling - Enter the amount (if any) being charged for shipping and handling.
Invoice Total - This is the total amount due for this invoice. It is calculated automatically.
Total Payments - This field displays the amount that has been paid on this invoice. It's automatically updated as additional payments are made.
Balance Due - This field shows the amount still owed on this invoice. It's automatically updated as additional payments are made.
Total Pending Payments - If you have created a payment plan for this invoice or added some future payments, the total will appear here.
The Images tab displays the images related to this session.
(available in ![]()
![]()
![]() )
)
All the production orders related to this invoice are listed here. See the section on "Working with Production Orders" for more information on production orders.
The Tasks tab displays all the tasks for this invoice.
The Online tab is used to show the online orders for this invoice.
Invoice Notes
- This is a memo field where you can enter any notes regarding the
invoice. Press Ctrl+T to stamp
the current date and time in the log, along with the logged in user's
initials, allowing you to track when the note was entered and who
entered it. You can also check the spelling by clicking ![]() .
.
Status Notes - Spectra automatically enters status log notes as a read-only field that displays a history of some of the changes for this invoice. Check the Print These Notes box to print the invoice notes on the invoice.
![]()
