(available in ![]()
![]()
![]()
![]()
![]() )
)
In this topic... Show
Now its time to break down the Client record. This screen is used to store all pertinent client information and to display other information that specifically relates to this client. Some of the client information stored here includes phone numbers, address, family members, client groups this client belongs to, and marketing plans in which this client is participating. All phone calls, emails, text messages, appointments, sessions, invoices, payments, and tasks related to this client are also listed on one of the detail tabs. New phone calls, messages, appointments, sessions, or tasks can also be created for this client from this record by clicking on the appropriate button on the ribbon toolbar across the top.
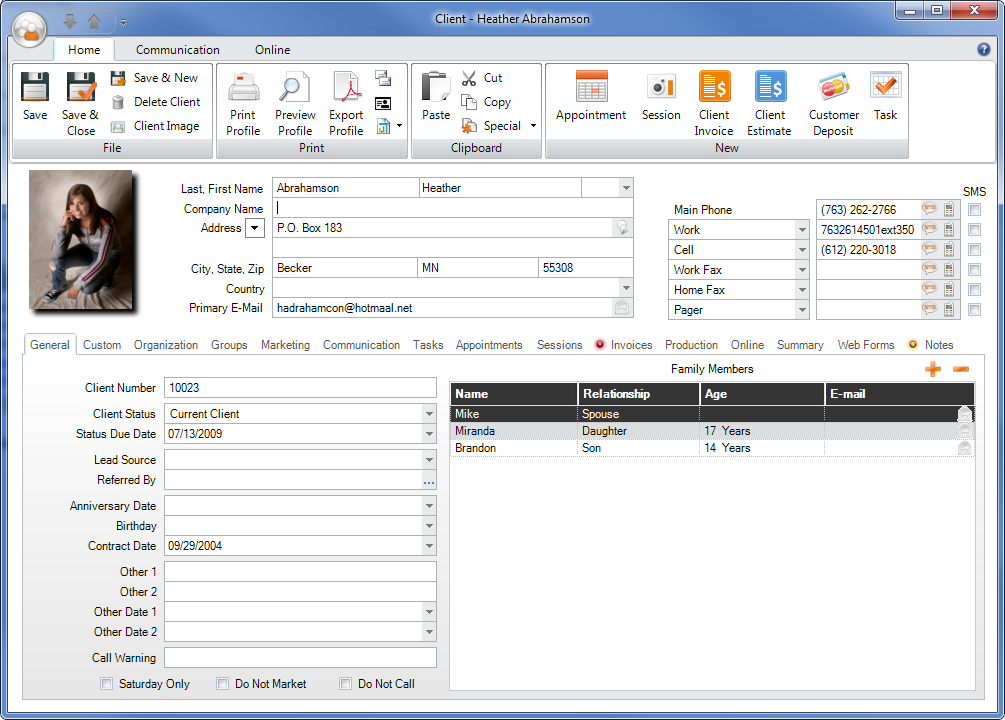
The Client Record
 |
WHAT HAPPENED TO THE FILE MENU? A lot of it is distributed in the Ribbon now for greater ease of use. |
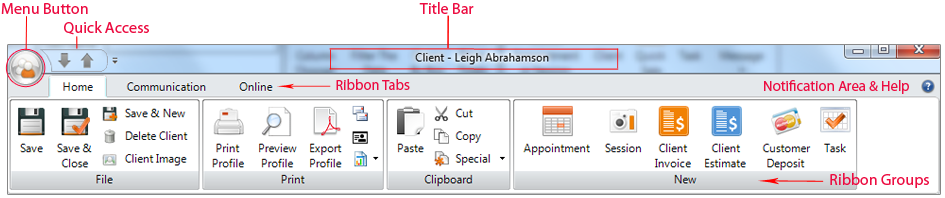
Menu Button
-  The Menu
button contains an icon based on the type of record. On a client record
it displays a person icon. Click the Menu
button to see menu choices such as: Save,
Save &
Close, Save
& New, Delete,
Payment Methods,
Merge Clients, and Close
Form. Note:
There may be additional choices depending on optional components of
Spectra. Many of the menu choices are also available on the
ribbon (described below), but there are several items that are only
available on the Client menu. They include:
The Menu
button contains an icon based on the type of record. On a client record
it displays a person icon. Click the Menu
button to see menu choices such as: Save,
Save &
Close, Save
& New, Delete,
Payment Methods,
Merge Clients, and Close
Form. Note:
There may be additional choices depending on optional components of
Spectra. Many of the menu choices are also available on the
ribbon (described below), but there are several items that are only
available on the Client menu. They include:
Payment Methods - Use this option to manage the client's payment methods. For more information, see the "Client Payment Methods" topic.
Merge with Another Client - The merge feature allows you to merge two clients. For more information, read the "Merging Clients" section of the "Managing Clients" topic.
Quick Access Bar - If you open the client from a hub, there will be grey arrows to quickly access the next or previous record in the list.
Title Bar - When a client has been saved, the title bar will say "Client -" followed by the name of the client.
Notification Area and Help Button - Just under the title bar to the far right, notification lights will appear if there is something about the client that warrants special attention. Click Help to get online help for this window.
Many of the same features available on the drop-down menu are also available on the ribbon. If you're not sure what a certain button is for, hold your cursor over the button and wait for the tool tip to be displayed. The ribbon has three tabs across the top that organize the tools you will use as you work with the client record.
This tab contains the File, Print, Clipboard, and New groups. Note: There may be additional groups on the ribbon when other components of Spectra are activated.
Save - Save the current client and leave it open for reference or additional modifications.
Save & Close - Save the client and close the client window.
Save & New - Save the client and open a new, blank record to create another client.
Delete Client - Delete the open client. Note: This will delete any associated communications, appointments, sessions, invoices, tasks, or production orders PERMANENTLY.
Client Image - For convenience, the first image imported into the client's first session will be saved as the main client image. Click Client Image to change the image or import a new one. You can also import a new image by clicking the headshot icon below. See the "Working with the Digital Workflow" chapter and the Pictorial Directory section of the Reports chapter for more information.
Print Profile - Print a summary of the client information.
Preview Profile - Preview the profile before printing.
Export Profile - Export the client profile as an Adobe PDF. You can also choose other electronic formats like text, rich text, Excel file, or even HTML.
Mailing Label - Print a mailing label showing the client's name and address, along with other information as defined in Printing Preferences.
Account Label - Print a file label with the client's name, address, phone number, and client number, along with other information as defined in Printing Preferences.
 |
HERE'S A FLASH FOR YOU!
If you want more options for printing a single label, go to Printing Preferences, and set Single Mailing Label to "Prompt for Printer." There is also an option to use a Dymo™ label printer in Workstation Preferences > Miscellaneous. |
Custom Reports - If you have imported a custom report that can be used from a client record, you can print, preview, or export it to PDF. See the section on Custom Reports for more information on what kind of reports can be used with a client.
You can Paste information that you copied or cut from another location or program into a single field. You can also Cut or Copy text from a single field to use elsewhere.
Special Copy - Copy the text (in label format) that would print onto a mailing label, client label, or account label to paste into another field or program.
Appointment - Create a linked appointment using this client.
Session - Create a new session for this client.
Client Invoice - Create a new client-based invoice for this client. Note that the client-based price list will be used for this invoice. For more information, see the Studio Preferences > Invoicing topic.
Client Estimate - Create a new client-based estimate for this client.
Customer Deposit - If a client makes a payment but you don't want to create an invoice yet, enter the payment as a customer deposit and then later apply it to an invoice.
Task - Create a task related to the client.
(available in ![]()
![]()
![]()
![]() )
)
New Call - By default, a new call record will be created with a due date of today and no completed date. You can use the call today or change the due date to another date in the future.
Completed Call - Create a call record that is both due and completed today.
Dial Phone - If you have a TAPI-compliant phone system connected to this computer, use this option to have Spectra automatically dial any of the client's phone numbers.
(available in ![]()
![]()
![]()
![]() )
)
New SMS Text - Click to create a new SMS text message or to merge the client information into a form letter or custom report that can be sent directly to the client as a text message. By default, the new text message will contain the first phone number on the client record that is marked for SMS.
New Email - Use this command to merge the client information into a form letter, HTML email, or custom report and then send the email directly to the client. An email address must be entered for the client and outgoing email must be set up on the computer you are working on. For more details, go to Workstation Preferences > Email.
Completed Email - Click to open a form that can be used to record details from client email that you received or sent outside of Spectra, attaching the information to the client record for future reference.
Print Letter - Use this button to select and print a pre-created form letter.
Preview Letter - Preview a form letter to view/modify the text before you print it.
Export Letter - Export the letter as an Adobe PDF. You can also choose other electronic formats like text, rich text, Excel file, or even HTML formats.
Mailing Label - Print a mailing label showing the client's name, address, and other information as defined in Printing Preferences.
Account Label - Print a file label with the client's name, address, phone number, client number, and other information as defined in Printing Preferences.
Special Copy - Copy the text (in label format) that would print onto a mailing label, client label, or account label to paste into another field or program.
View All - Show all notes related to the client. This consolidated view displays all notes from the client, invoices, sessions, communications, and tasks.
If your studio has a HoldMyMemories account and your studio information has been entered in the HoldMyMemories.com Preferences, you can use the tools in this group to manage the client's HoldMyMemories.com account.
Create Account - Create a new HoldMyMemories account for the client. This will open a window containing the client information you already have in Spectra to establish an account with HoldMyMemories.com. For more information see the topic on HoldMyMemories.com.
Upgrade Account - If the client already has a HoldMyMemories account but wants to upgrade to another level, use this tool to make the changes.
View Site - View the client's HoldMyMemories.com site.
If your studio has an InSpiredByYou.com account and you have set up your InSpiredByYou.com Preferences, you can use tools in this group to manage the client's InSpired account information. See the chapter on InSpiredByYou.com for more information.
Reset Login - If the client has changed their default password and then forgotten it, use this button to reset it. You won't be able to see the password they selected, but this will reset the password back to their last name (default).
View Site - View the client's InSpiredByYou.com site.
The main client information is visible here, including client name, address, email, phone numbers, and a red call warning (see below for more details on call warnings).
Client Image - You can view a client image. Click Client Image to acquire or change a client image.
Name and Salutation - Enter the client's last name, first name, and salutations.
Company Name - Enter the client's company here. If there is no company name and you have selected an organization on the client's Organization tab, that organization name will display here. To revert back to company name, delete the organization name from the Organization tab and re-open the client.
Address - Enter the address and press Tab. When you enter the zip code, the city and state information will automatically be filled in. If it isn't, enter the city and state information and Spectra will save that for next time. For more information on the zip code look-up feature see the "Zip Codes" topic in the "Spectra Maintenance" chapter.
New Address - A drop-down is provided if you wish to enter a "new" address and effective date for a client. This could be used for a wedding couple that will have a new address after the wedding. Spectra will automatically replace the main address with the new one when the effective date arrives. The old address will be copied to the client's Notes tab. The new address and effective date fields will be reset.
Google® Maps -  Click this button anywhere
in Spectra where there is a client address. As long as you are connected
to the internet, Spectra will open the Google Maps page to show the
client's address.
Click this button anywhere
in Spectra where there is a client address. As long as you are connected
to the internet, Spectra will open the Google Maps page to show the
client's address.
Primary Email
- Fill in the main client's primary email address. You can also create
a new blank email to this client by clicking the envelope  icon.
icon.
Phone Numbers
- Enter the client's main phone number. Spectra will automatically
format the phone number. If you enter just 7 digits, Spectra will
add the default area code. For more information on setting the default
area code, see Studio
Preferences > Phone Calls. If you have a TAPI-compliant phone
system connected to this computer, you can use this button  to have Spectra automatically
dial the displayed client's phone number.
to have Spectra automatically
dial the displayed client's phone number.
SMS - Check the SMS option for one or more phone numbers that should receive text messages. Remember, each text message you send will be included in your monthly message count.
Detailed information about the client can be found here. Each tab holds corresponding information about the client. You can sort the records on each tab by clicking the column label. For many of the lists, when you open one record from a tab that contains multiple records, you can click the gray arrows on the title bar to see the next item from the list.
|
HERE'S A FLASH FOR YOU!
Would you like to simplify your client display a bit? You can choose which tabs to display in Studio Preferences > Clients. For more information, see the section on Studio Preferences > Clients. |
From the General tab you can view or enter the client's number, client status, status due date, their lead source, who they were referred by, their anniversary and birth dates, as well as the contract date and any call warning messages they may have. This is also where information about the client's family members located. There are checkboxes for Saturday Only, Do Not Market,and Do Not Call.
Client Number - Spectra will automatically assign the client number, however, you can modify the number to another UNIQUE number. For more information see Studio Preferences > Clients.
Client Status - Select the client's status. Use the client status to track prospective clients and what level your current clients are at. See the "Client Statuses" topic in the Spectra Maintenance chapter for more information. Assign a loyalty-enabled status to reward them for return business. See the "Process Loyalty Rewards" topic for more information.
Status Reason - This box will appear only if the selected status has been set up to include status reasons. Status reasons are optional and can be defined for each status in Maintenance > Client > Client Status Reasons.
Status Due Date - The due date of the client status.
Lead Source - Use the lead source field to record how this client heard about you (What is the source of this lead?). This information can be critical in reviewing sales analysis reports.
Referred By - You can either type a name or click the more (...) button to find a client already in your database. You can use this information for promotions, perhaps to reward clients who generate more business for you.
Anniversary Date - Record the main client's anniversary date. This can be used for future promotions or just for your information.
Birthday - Record the main client's birthday. This can be used for future promotions or just for your information.
Contract Date - If your studio requires clients to sign a contract, use this field to record when the contract was received.
Custom fields - You can enter some custom information about your client. There are two text fields and two date fields.
Call Warning - Call warnings are messages that appear on the Client record, alerting users to special instructions, such as "This is a surprise party, don't talk to spouse." If there is a call warning for a client, it will appear next to the phone number anywhere it is listed in Spectra.
|
HERE'S A FLASH FOR YOU!
Have you ever wished you or another employee knew a key piece of information about five minutes earlier than you actually did? Our Call Warning feature is a great way to keep you informed of key information as soon as you open a client record. Any time Spectra displays a client's name and phone number, it will also display the call warning in bright red flashing letters. Here are some sample call warnings: Works nights, call after 5! Don't talk to husband, it's a surprise! Great client, take good care of! Difficult client, don't schedule anything! |
Saturday Only - The Saturday Only checkbox can be used to note which clients prefer to book sessions or appointments only on Saturdays.
Do Not Market - Check the Do Not Market box if the client does not want to receive marketing material from you. Spectra will exclude clients with this box checked when printing group mailing labels, group form letters, and when sending group emails and text messages.
Do Not Call - Check the Do Not Call box if this client does not want to be called. Spectra will exclude clients with this box checked when creating a Group of Call Records.
Family Members
- Click on the orange plus (+) sign to add a new family member. Here
you can enter the name of the family member, their relationship to
the client, and their birthday, along with their phone number(s) and
an email address. To modify an existing family member, simply double-click
the desired family member from the list, modify the information, and
click OK. Ages are tracked
only until they turn 22. The age will not show for anyone 23 years
old or older.
A family member can be designated as a "Secondary Contact."
A secondary contact's name will stored in the client table, making
them available in form letters and on the hub screens.
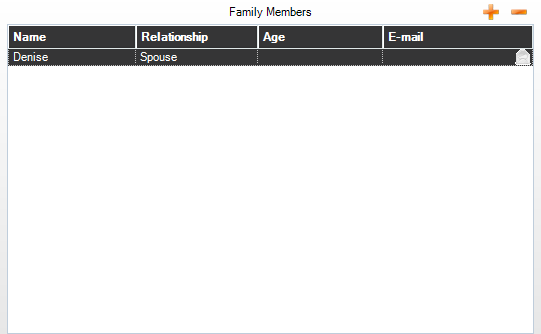
Family Members List
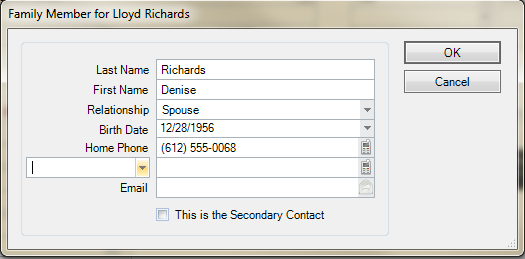
Family Member Record
(available in ![]()
![]()
![]() )
)
Spectra also gives you a number of customized fields on the Custom tab. You can use them to store information that isn't already stored in Spectra, but you would like to track for your customers. The General tab has 2 short text fields and 2 date fields. On the Custom tab, there are 10 more short text fields, 2 date fields and 2 notes fields. The notes fields are memo types of fields where you can add as much text as you need to. You can define how these fields are labeled in Maintenance > Studio > Custom Labels.
(available in ![]()
![]()
![]() )
)
If this client is a senior or a member of an organization, you can view or enter organization information on this tab. This information will automatically transfer to the session record when you create a new session.
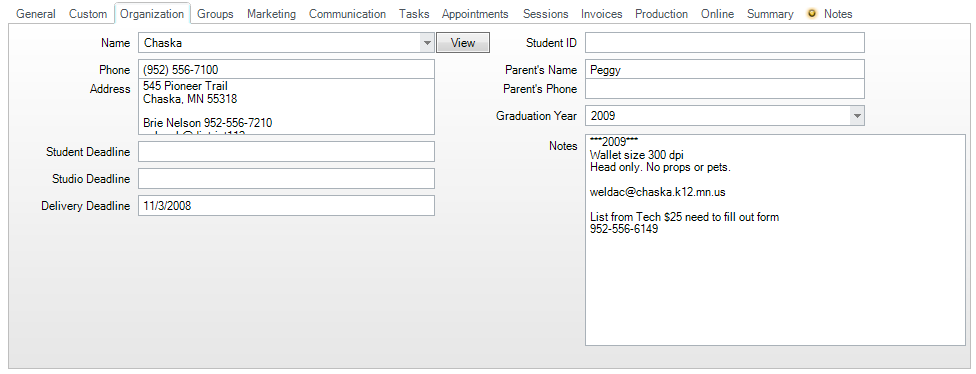
Organization Name - Select the organization name from the list of organizations. All the remaining organization-related fields will automatically fill in. To add or modify an organization, go to Maintenance > Client > Organizations and complete the information for that organization. Click View to see all the information for the selected organization.
Student ID - Enter the student ID. This information can be used in the naming process for yearbook images and can also be used to search for duplicate records within an organization.
Parents Name and Phone - Enter the parents' name(s) and phone number here.
Graduation Year - If this is a senior, you can select the year they will be graduating from the drop-down list. The list should include the last ten years and ten years into the future.
The Groups tab lists all of the available groups in the left panel and all of the groups that the client belongs to in the right panel. Using groups is a great way to maintain your client list. You can manage your clients by categorizing them into groups such as high school, prospect, portrait client, wedding client, commercial client, etc. You may even want to create a group for troublesome clients you would rather not have back. (See the "Client Groups" topic under Spectra Maintenance for details on how to add, delete, and modify your client groups.)
(available in ![]()
![]()
![]() )
)
The Marketing tab lists all of the available marketing plans in the left panel and all of the marketing plans that the client belongs to in the right panel. Marketing plans are a great way to keep your clients informed of your studio's various promotional events and to keep track of your client's interests. Marketing plans also remind the clients of special events in their lives for which they may want to schedule a session. Once you've discovered your clients interests, use this section to note those interests on the client's record. For date-sensitive events, (i.e., birthdays), Spectra will automatically create a call record 'x' number of days prior to the special date. (The number of days is set up on the Marketing tab in Studio Preferences. See the "Studio Preferences - Marketing" section for details.) This allows you to call the client, remind him/her of the special date, and book the session. Non date-sensitive events can be filtered later to generate phone calls, emails, text messages, or perhaps to generate a mail merge. See the "Studio Preferences" section for information on setting up the marketing plans.
 |
PATHWAYS TO SUCCESS
Marketing plans can be a key to the success of your studio. If you use nothing else in Spectra, use this feature! Using it can significantly increase your sales revenue. For example, if you have several empty time slots in the next few days you could use Spectra to find those clients who have already indicated an interest in conducting a "Fall Colors" session. Find those clients, call them, and book those sessions. Be creative in how you use this feature, and be more successful. |
(available in ![]()
![]()
![]() )
)
The Communications tab lists all phone calls, emails, SMS text messages, and letters – completed or not – related to this client. Double-click on a communication record to modify it.
Due Date - The due date is the date that the communication is to be made.
Complete Date - The complete date is the date that the communication was made.
Type - The communication can be a phone call, letter, email, or SMS text message.
User - Which user is assigned the call or who sent the letter, email, or text.
Call Type - If the communication was a phone call, call type tells you what type of call to place to the customer, such as a reminder that their son's birthday pictures need to be scheduled.
Description - The description that was typed into the call record, the name of the letter, or the subject line of an email.
Direction - outgoing
For more information on communication records and their options, please see "Working with Communications."
The Tasks tab lists all tasks – completed or not – related to this client. To view the complete details of the task, double-click on it in the list.
The Appointments tab lists all appointments – completed or not – related to this client. To view the complete details of the appointment, double-click on it in the list.
N and C - These read-only columns display the status of the "No Show" (N) and "Cancelled" (C) options for the appointment.
Appointment Date - The appointment date is the date that the appointment is to take place.
Type - An appointment type would be something like "wedding consultation."
Description - An appointment description tells you why you have set up the appointment. It could be something like "wedding consultation with Bill and Sue to finalize session time." This is displayed on the Calendar hub.
The Sessions tab lists all sessions – completed or not – related to this client. Double-click on a session to view the complete details or to modify it.
H, N, R, and C - These read-only columns display the status of the "On Hold" (H), "No Show" (N), "Rescheduled" (R), and "Cancelled" (C) options for the session.
Date - This is the primary date the session is to be held.
Session No - The session number of the displayed session. Note that depending on your options selected, this may be a combination of name and number.
Type - This is the type of session being held.
Description - The session description tells you why you have set up the session. It could be something like "Johnson family portrait."
Status - This is where the session currently is within the workflow cycle.
|
HERE'S A FLASH FOR YOU!
A session will remain open or active until all session activities have been completed. Even after the actual photography portion of a session is completed, there may still be other events outstanding. Use Session Status Maintenance to set up your session statuses. |
The Invoices tab lists all invoices generated for this client. To view the complete details for an invoice or to modify it, double-click on the entry.
View All Invoices is to view all invoices for this client, whether they were the session client or the bill-to client.
View Session Invoices Only is to view invoices where this client was the main session client.
View Bill-to Invoices Only is to view all invoices that will be billed to this client, but they weren't necessarily the session client.
Invoice No. - The invoice number is a unique number assigned by Spectra when the invoice is saved. However, it can be changed later to another unique number.
Date - The invoice date is the date that the invoice was created.
Type - The type of invoice can be initial order, session fee, reorder, credit memo, or estimate.
Description - An invoice description can be entered to better identify what this invoice was for.
Invoice Total - The invoice total is the total dollar amount for the invoice.
Amount Paid - The amount paid is how much has already been paid toward the invoice.
Balance Due - The balance due is the amount still owed for the invoice.
(available in ![]()
![]() )
)
The Production tab is used to quickly find the status of an order that is in production.
View Production Orders is to view just production orders.
View Proof Orders is to view only proof orders.
Invoice No. - Number of the invoice that associated with a particular order.
Invoice Date - Original date of the associated invoice.
Order No. - The order number if one was created.
Order Date - The date the order was created.
Vendor - The specific vendor used to fulfill the order.
Due Date - The date the order is due back from the vendor.
Status - This is where the order is in the workflow cycle.
The Online tab is used to quickly reference this client's information for HoldMyMemories.com and InSpiredByYou.com.
Start Date - Date the client first signed up with HoldMyMemories.com.
User Name - Client's online user name for their personal HoldMyMemories.com site.
Website - The URL of the client's personal HoldMyMemories site.
Start Date - Date the first client session was uploaded to InSpiredByYou.com.
The Summary tab lists important details about the client. These include dates, financial status and transactions, referrals, and loyalty rewards.
Record Create Date - The date the client record was created.
Created By - What Spectra user was logged in when the client record was created.
Client Since Date - Automatically filled in with the date of their first session.
Last Session - The date that the client was most recently in for a session.
Last Call Date - The date that the client was most recently called on the phone.
Sales Figures
Sales figures are split into lifetime sales and year-to-date (YTD) sales.
Lifetime sales are those sales that have been recorded since you started using Spectra for this client.
YTD sales are those sales that have been recorded since January 1st of the current year.
Sales figures are also split into session sales and bill-to sales. For most clients, these numbers are the same.
Session sales are all the sales made where this client is the client being photographed.
Bill-to sales are the sales made where this client is paying the bill. An example could be a bride's parents who are paying the bill (bill-to clients), but who are not the session client.
Open Balance - The total of all invoices that are not yet due and those that are past due.
Not Yet Due - Total of all invoices that have been created for this customer that have not yet come due.
Past Due - The total of all invoices that have come due but remain unpaid.
Here you can see how much this client has referred to you. Included is the number of other clients in your database that have this client's name as the referral source and the sales generated from those clients.
(available in ![]()
![]()
![]()
![]() )
)
The total amount the client has for currently issued but not redeemed or expired loyalty rewards.
The Financial Transactions tab lists individually the date, description, and amount of all of the invoices, credit memos, payments, and refunds for this client. The most recent items will appear on top by default, but you can sort on any of the columns by clicking on the column header. Double-click on any payment or invoice to open it and view all its details.
The first name, last name, and main phone number of the clients that have this client listed as their referral.
(available in ![]()
![]()
![]()
![]() )
)
Lists the details of any loyalty rewards the customer has earned. You can double-click on any entry to get further details of a reward. The orange plus sign allows you to manually add a new loyalty reward.
Client
Notes - This is a memo field where you can enter any notes
about the client you need to. You can type Ctrl+T
and the current date and time, along with the logged in user's initials,
will be stamped in the log so you can track who entered the note.
You can also check the spelling by clicking on the ABC
button ![]() .
.
Status Notes - Spectra automatically enters status log notes when the client status changes, when a group email or text message is sent, and when a group of form letters are printed.
|
PATHWAYS TO SUCCESS
Have you noticed the lights yet? Throughout Spectra, you may see a red or yellow light. These lights indicate something important that you should pay attention to. Perhaps the client has an outstanding invoice and owes you money, has a customer deposit waiting to apply to an invoice, has an overdue phone call, or some notes should be looked at on the Notes tab. Allow Spectra to insure that you and your staff don't overlook key pieces of information when working with your clients. |
![]()