(available in ![]()
![]()
![]()
![]()
![]() )
)
In this topic... Show
A Session record is used to store all pertinent session information and to display other related information regarding this session from other records. Some of the session information stored here includes session date, time, resources, photographer, assistant, and participating family members. All communications, invoices, and production information related to this session are also listed on one of the detail tabs. New phone calls and invoices can also be created for this session by clicking on the appropriate button on the ribbon. In addition, all post session production information related to this session can also be accessed from this screen. To open a Session record, double-click on any session from the Sessions hub or from the Workflow Stages section in the Digital Workflow.
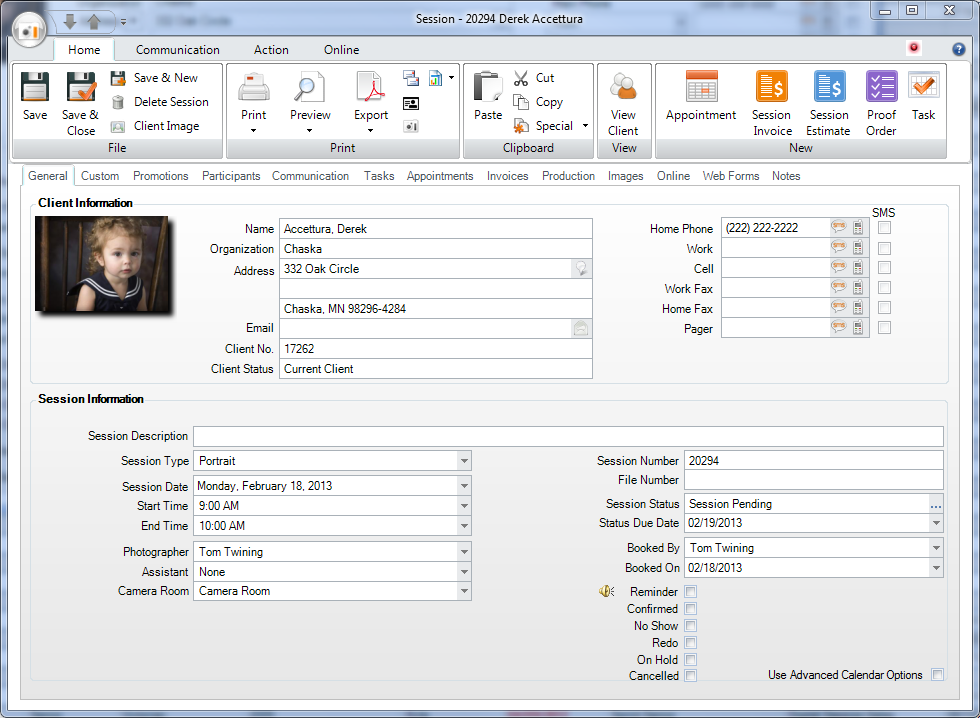
Session Record
The Session record is divided into two sections. The Session menu and ribbon are at the top, and the Session detail section, which contains multiple tabs of information, is below the ribbon.
 |
WHAT HAPPENED TO THE FILE MENU?
A lot of it is distributed in the Ribbon now for greater ease of use. |
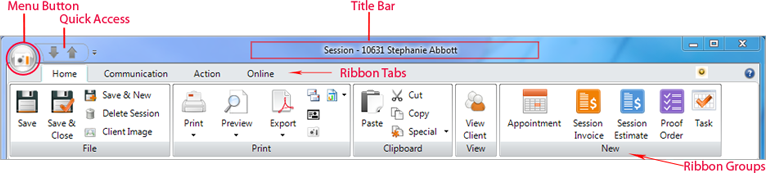
The Menu button - The Menu button contains an icon based on the type of record. On a session record it displays a camera icon. Click the Menu button to see menu choices such as: Save, Save & Close, Save & New, Delete, Payment Methods, and Close Form. Note: There may be additional choices depending on optional components of Spectra.
Quick Access bar - If you open the session from a hub, there will be gray arrows to quickly access the next or previous record from the list.
Title bar - When a session has been saved, the title bar will say "Session -" followed by the session number and the client name.
Notification area and Help button - Just under the title bar to the far right, notification lights will appear if there is something about the client or session that warrants special attention. Click Help to get online help for this window.
Many of the same features available through the drop-down menu are also available on the ribbon. If you're not sure what a certain button is for, hold your cursor over the button and wait for a tool tip to be displayed. The ribbon has four tabs across the top that organize the tools that are available as you work with a session.
This tab contains the File, Print, Clipboard, View, and New groups.

Save - Save the current session and leave it open for reference or additional modifications.
Save & Close - Save the session and close the session window.
Save & New - Save the record and open a new, blank record to create another new session for the same client.
Delete Session - Delete the open session. Note: Deleting a session will delete any associated communications, appointments, advanced calender events, invoices, or production orders PERMANENTLY.
Client Image - For convenience, the first image imported into the client's first session will be saved as the main client image. Click Client Image to change the image or import a new one. You can also import a new image by clicking the headshot icon below. See the "Working with the Digital Workflow" chapter and the Pictorial Directory section of the Reports chapter for more information.
Session Confirmation - Produce a session confirmation for this client. It's recommended that you print two copies, one for the client and one for your records. If this session is a wedding or social event, Spectra will automatically produce a wedding or social event confirmation containing all the information from the Social Event tab.
Photographer Confirmation - Produce a confirmation for the photographer and/or the assistant with all the information about the client and the session, along with any notes entered for the session. This can be especially handy for photographers working remotely.
Contact Sheet - A contact sheet shows all the images imported for this session along with their image numbers.
Preview - Preview the session or photographer confirmation before printing.
Export - Export the session or photographer confirmation as an Adobe PDF. You can also choose other electronic formats like text, rich text, Excel file, or even HTML.
Mailing Label - Print a mailing label showing the client's name and address, along with other information as defined in Printing Preferences.
Account Label - Print a file label with the client's name, address, phone number, and client number, along with other information as defined in Printing Preferences.
Session Label - Print a label showing the session number along with additional session and client information.
 |
HERE'S A FLASH FOR YOU!
If you want more options for printing a single label, go to Printing Preferences, and set the Single Mailing Label to Prompt for Printer. There is also an option to use a Dymo label printer in Workstation Preferences > Miscellaneous. |
Custom Reports - If you have imported a custom report that can be used from a session record, you can print, preview, or export it to PDF. See the "Custom Reports" topic for more information on what kind of reports can be used with a session.
You can Paste information that you copied or cut from another location or program into a single field. You can also Cut or Copy text from a single field to use somewhere else.
Special Copy - Copy the text (in label format) that would print onto a mailing label, session label, or account label to paste into another field or program.
View Client - Open the client associated with this session.
Appointment - Create a new appointment associated with this session.
Session Invoice - Create a new session-based invoice. The first invoice created for a session will automatically be set as a "Session Fee" type invoice. See the "Features of Invoice Records" topic for more information about invoice types and when they are set.
Session Estimate - Create a new estimate invoice for this session. This will create a new invoice and set the invoice type to "Estimate" automatically.
Proof Order - Create a proof order based on this session.
Task - Create a new task linked to this session.

New Call - A new call record will be created with the due date set to today and no completed date. You can use the call today or change the due date to a date in the future.
Completed Call - Creates a call record that is both due and completed today.
Dial Phone - If you have a TAPI-compliant phone system connected to this computer, you can use this button to have Spectra automatically dial any of the client's phone numbers.
(available in ![]()
![]()
![]()
![]() )
)
New SMS Text - Create a new blank text message or one based on a form letter. By default, the new text message will contain the first phone number on the client record that is marked for SMS.
New Email - Use this button to create an email to be sent to this client's main email address. You can create a blank email with just the client's name and email filled in, or one with the session confirmation or contact sheet already attached. You can also have the client and session information merged into an email from a form letter, HTML email, or custom report that can be sent directly to the client. You need to have the client's email address entered in the record and email set up on the computer you are using. For more details, go to Workstation Preferences > Email.
Completed Email - Click to open a form to record details from client email that you received or sent outside of Spectra and want to save for future reference.
Print Letter - Use this button to select and print a pre-created form letter.
Preview Letter - Preview a form letter to view/modify the text before you print it.
Export Letter - Export the letter as an Adobe PDF. You can also choose other electronic formats like text, rich text, Excel file, or even HTML formats.
Mailing Label - Print a mailing label showing the client's name, address, and other information as defined in Printing Preferences.
Account Label - Print a file label with the client's name, address, phone number, client number, and other information as defined in Printing Preferences.
Session Label - Print a label showing the session number and other session and client information.
Special Copy - Copy the text (in label format) that would print onto a mailing label, session label, or account label to paste into another field or program.
View All - Show all notes related to the session. This consolidated view displays all notes from the client, invoices, communications, and tasks.
(available in ![]()
![]()
![]() )
)
Upload Contract - Select a contract for this session. The contract will be uploaded to InSpiredByYou during the next InSpired data sync. Create contracts by using the Form Letter Builder on the Tools menu.
View Contract - View the contract that has been selected for this session. When viewing the contract you will also have options to cancel, print, or email it.
Cancel Contract - Cancel a contract for this session.

Send to Darkroom - Use this button to create a catalog in Express Digital Darkroom if one was not created automatically. See the "Express Digital" topic in the "Integrated Software" chapter for more information.
Launch Capture Software - If you have capture software set up in this computer's Workstation Preferences > Digital tab, you can use this button to launch that software.
Import Images - Combine copying images, creating previews, archiving, and adding metadata into one convenient window. See the "Capture Images" section of the "Working with Digital Imaging" chapter for more information.
Group Capture - Import a number of sessions at once like in a school class picture day. See the "Group Capture" topic in the "Working with Digital Imaging" section.
Render Proof Images - Apply any changes you've made to the images during the import process or in sales presentation preparation and creates images from those settings. See the "Render Images" section of the "Sales Presentation" topic.
Send Images to Lab - See the "Send Images to Lab" topic.
Archive Images - See the "Archive Images" topic.
Delete Images - See the "Delete Images" topic.
New Album - Add a new album to this session for upload to InSpiredByYou. You will be able to enter a description, select a status, and browse to the folder containing the album pages. For more information about uploading an album to InSpiredByYou, see the "Uploading an Album" section of the "Using InSpiredByYou" topic.
New Animoto - Embed an Animoto® video you've created for this client on their InSpiredByYou online gallery. Enter a description and paste the embed string provided with your Animoto video. See the "Uploading an Animoto Video" section of the "Using InSpiredByYou" topic.
Start Presentation - Start a sales presentation.
Start Slideshow - Start the slideshow.
Change Slideshow Settings - Adjust your custom settings before starting a slideshow.
Stop Music - Stop the music after a slideshow has finished. For more information on slideshow setup, see the Preferences section of the Setting up Digital Workflow in Spectra.
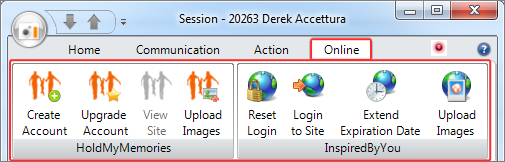
If your studio has a HoldMyMemories account and your studio information has been entered in the HoldMyMemories.com Preferences, you can use the tools in this group to manage the client's HoldMyMemories.com account.
Create Account - Create a new HoldMyMemories account for the client. This will open a window containing the client information you already have in Spectra to establish an account with HoldMyMemories.com. For more information see the topic on HoldMyMemories.com.
Upgrade Account - If the client already has a HoldMyMemories account but wants to upgrade to another level, use this tool to make the changes.
View Site - View the client's HoldMyMemories.com site.
Upload Images - Upload images from the Spectra session to the client's HoldMyMemories.com site.
If your studio has an InSpiredByYou.com account and you have set up your InSpiredByYou.com Preferences, you can use tools in this group to manage the client's InSpired account information. See the chapter on InSpiredByYou.com for more information.
Reset Login - If the client has changed their default password and then forgotten it, use this button to reset it. You won't be able to see the password they selected, but this will reset the password back to their last name (default).
Login to Site - View the client's InSpiredByYou.com site.
Extend Expiration Date - If you have a InSpiredByYou.com account and this is a session that you have previously uploaded to the site, use this tool to extend (or shorten) the web expire date. Simply choose the desired date and click OK. Another window will open indicating whether or not the change was successfully synced to the website. If you want to take the session down, set the expire date to today. The session will then show up on the Web Services panel on your Spectra Home page as a session ready to expire.
Upload Images - Upload images from this session to InSpiredByYou.com using the InSpired Session Uploader.
This is where all of the details of the session are located. Each tab holds corresponding information about the client and session.
|
HERE'S A FLASH FOR YOU!
Would you like to simplify your session display a bit? You can choose which tabs to display in Studio Preferences > Sessions. For more information, see the section on Studio Preferences > Sessions. |
On the General tab, you can view or enter the session description, session type, session date, session start time, session end time, studio, photographer, assistant, and outside location (if any).
This is where the client's first and last name, company name, and client phone numbers are located or entered. You will also see any call warnings for this session listed here.
Session Description - Enter a brief description about the session such as "Family Session." (optional)
Session Type - Choose the session type from the drop-down list. You may define as many session types as you need. Session types are created under Maintenance > Session > Session Types. Refer to the "Spectra Maintenance" chapter for more information.
Session Date - Record the date on which the session will take place.
Start Time - Record the time the session will begin. You can type this in or choose it from the drop-down list.
End Time - Record the time the session will finish. You can type this in or choose it from the drop-down list.
Photographer - Record the name of the person taking the photographs. You can type this in or choose from the drop-down list.
Assistant - Record who (if anyone) will be helping the photographer. You can type this in or choose from the drop-down list.
Camera Room - Record the studio location (if any) where the session will take place. You can type this in or choose it from the drop-down list.
Outside Location
- Enter information about the location of any sessions that will take
place away from the studio. Note:
This field will only appear if the camera room field is set to 'outside
location.' Use Google maps  to
view the address location.
to
view the address location.
Session Number - The session number is a unique number that Spectra assigns to each session. You can change this number after Spectra has created it to another UNIQUE number.
File Number - Record any special number that your studio uses to track sessions.
Session Status and Due Date - Record the current status for this session and the date this session is due to advance to the next stage. See the "Session Statuses" section of the "Spectra Maintenance" chapter for more information on this feature.
Booked By Name and Date - Spectra will automatically record the user that booked this session and the date this session was created.
Reminder - Check the Reminder box if you want Spectra to display a reminder on the screen before the session starts. Select the number of minutes before the session starts that you want the reminder to appear.
Confirmed - Check the Confirmed box if this session has been confirmed with the client. Doing so will show the word "Confirmed" on the calendar next to this session.
No Show - Check the No Show box if this client did not show up for their session. These sessions will be flagged in the system for future reference.
Redo - Check the Redo box if this session is a retake for a previous session.
On Hold - Check the On Hold box if this session is on hold. These sessions will not appear on the calendar.
Cancelled - Check the Cancelled box if this session has been cancelled. These sessions will not appear on the calendar so you can book other sessions in that time slot.
Use Advanced Calendar options - This option allows you to select multiple times/dates, photographers, resources, and other combinations for more advanced scheduling. Maybe you have a session that spans two days or a wedding where you need to record the date and time for the pre-ceremony locations and the ceremony locations. Once you check this box, a new Calendar tab will appear right after the General tab. See the Calendar tab section below for more information.
(available only if using the "Advanced Scheduling" option)
The Advanced Scheduling feature allows you to create multiple date/time, photographer, and location combinations for one session. This will allow you to create a session that has multiple days, photographers, assistants, and/or locations. When using advanced scheduling, the initial time, date, and photographer are designated as the Primary event. Note: Spectra uses the primary event's time, date, and photographer for all reports and it cannot be deleted.
On the session General tab, check the Use Advanced Calendar Options box in the lower-right corner.
A new Calendar tab will appear.
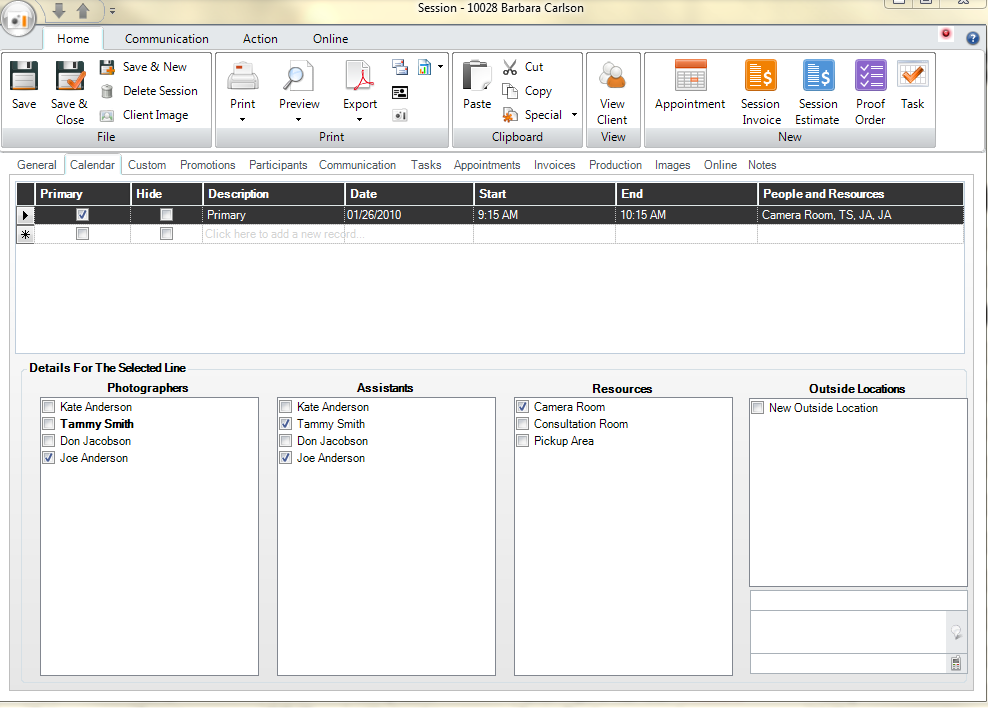
Session - Calendar Tab (Advanced Scheduling)
The Calendar tab will list the primary event. This primary record is used to determine the primary date/time and the primary photographer. Note: Sales from this session will be assigned to the primary photographer.
Click on a new line to schedule another event.
Enter the description and the date/time. Use the Hide checkbox to prevent this specific event from showing on the calendar.
Select the photographers, assistants, resources, and outside locations that will be included on this event. If you would like to designate one of the photographers as the primary, right-click on one of the checked photographers and make the selection to Set Primary Photographer.
You can sort this table by any of the column headers. Click on the arrow button at the start of a line to delete an event line from the table. If you click on the asterisk button at the beginning of a blank line, Spectra will create a new line with the same date/time as the previous line. You can easily add a daily or weekly event this way. Just change the date. You will still need to select the photographers, assistants, resources, and/or outside locations for each new line.
Click Save on the Home tab of the session ribbon. These session events will now appear on the corresponding calendars for each photographer, assistant, and resource.
(available in ![]()
![]()
![]() )
)
(available only on session types with an "Organization" session style)
If this session is for an organization (formerly known as "Senior"), you can view or enter organization information on this tab. If the client has information on their Organization tab, this information will automatically be entered here.
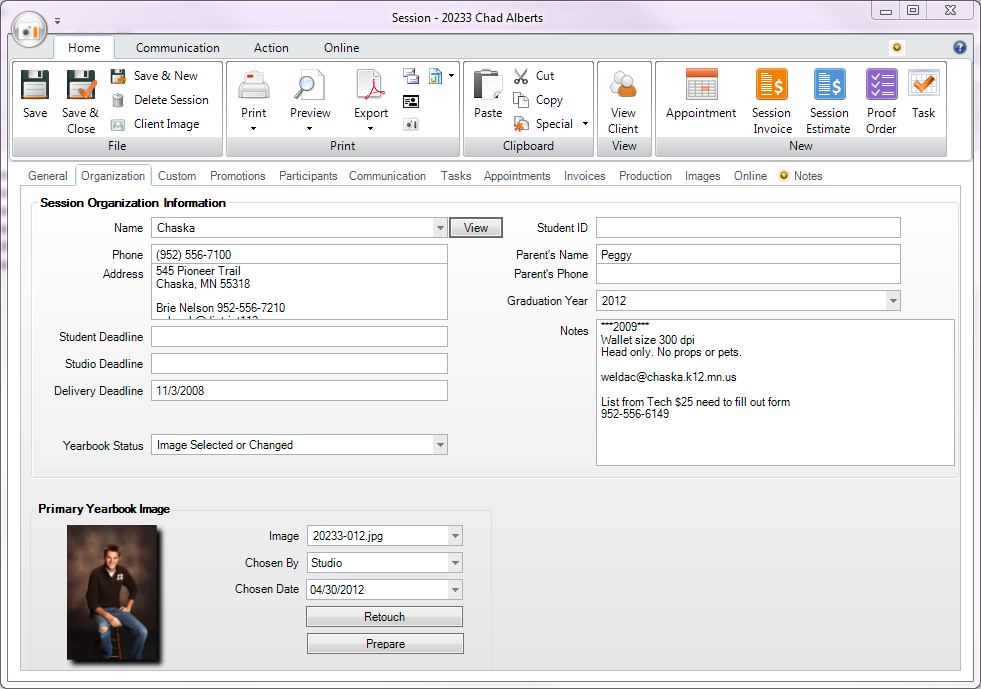
Organization Information - Select the organization name from the list of organizations. Spectra will automatically fill in all the remaining organization-related fields. To add an organization, go to Maintenance > Client > Organizations and complete the information for that organization. Click View to see additional information about this organization.
Parent's Name and Phone - Enter the parent's name and phone number here.
Student ID - The student ID number is shown here but is maintained on the Organization tab on the client record.
Graduation Year - Enter the year the client will be graduating here. If you chose an organization style session in the Client Wizard, the year should default to the next calendar year. You can select the year from the drop-down list.
Yearbook Status - Select a yearbook status manually or set up Spectra to automatically assign a yearbook status when a yearbook selection has been made (or modified). Set up that option on the Organizations page of Studio Preferences.
Image - Select the yearbook image by clicking the drop-down list and selecting an imported image. You can also select the yearbook image(s) on the Images tab or on the Digital Workflow screen by right-clicking an image and selecting "Make This Image the Main (or Secondary) Yearbook Image." Note: The session must be an organization style session in order for this option to appear.
Chosen By - The Chosen By field will indicate who selected the yearbook pose – the student, the school, the parent, or the studio. If the pose was selected in Spectra, this field will default to "studio." If selected on InSpiredByYou.com, it will default to "student."
Chosen Date - The date the yearbook pose was selected.
Retouch - Click Retouch and Spectra will copy the hi-res image into the retouched folder and then open that image in Photoshop for editing.
Prepare - Click Prepare and Spectra will open either the retouched or the hi-res image in a new composite window. Here the image can be resized and positioned. Click OK to have Spectra render out a new final image according to the organization's specifications and save it in the new yearbook images folder for this organization.
(available
in ![]()
![]()
![]() )
)
(available only on sessions with a "Social Event" session style)
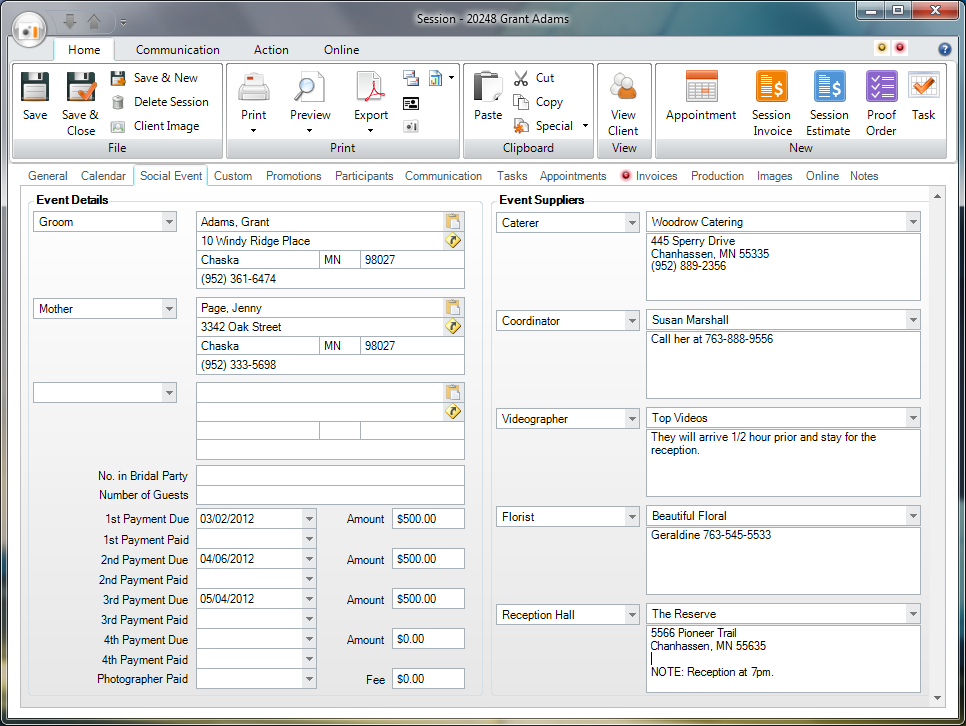
If this session is a social event, like a wedding, you can view or enter special information on this tab. This information will print on the social event confirmation.
First Contact Name and Address - Record the bride's name and address (or other first contact). If her address is the same as the main client, simply click the Copy button next to these fields.
Second Contact Name and Address - Record the groom's name and address (or the second contact). If his address is the same as the main client, simply click the Copy button next to these fields.
Third Contact/New Address - Record the bride and groom's new address (or the third contact). If this address is the same as the main client, simply click the Copy button next to these fields.
No. in Bridal Party - Record the number of people in the bridal party.
Number of Guests - Record the number of expected guests.
Payment Due/Paid - Record when the payments are due and when they are paid. Note: These payment information fields have no tie to an invoice or actual payments recorded on an invoice. They are here so they can be used in form letters and session confirmations.
Social Event Suppliers - Record the other social event suppliers, such as the caterer, florist, etc.
(available in ![]()
![]()
![]()
![]() )
)
Spectra gives you multiple customizable fields for each session where you can enter whatever information you want. To change the labels that appear next to each field, go to Maintenance > Studio > Custom Labels and go to the Session tab.
(available in ![]()
![]()
![]()
![]() )
)
The Promotion tab is used to record one or more promotions that this session belongs to.
 |
PATHWAYS TO SUCCESS
How you can use promotions to more effectively manage your business? A promotion might be something like Santa Claus, Bunnies, Fall Colors, etc. A promotion might also be something like Spring Sale, Two-for-One, Free Session Fee, or Referral Coupon. If you record this promotion information, you'll be able to generate analysis reports on the effectiveness of your various promotions. Never again will you wonder if you should run a promotion again. You'll know what works and what doesn't. |
Use the Participants tab to record any family members that will be participating in this session.
(available in ![]()
![]()
![]() )
)
The Communications tab displays all phone calls, emails, text messages, and letters for this session, regardless of status. To access the complete details of the communication, double-click on the desired record. You can sort the list by any column and, once you open a record from this screen, you can use the grey arrows in the upper-left corner to choose the next or previous record in the list.
Due Date - The day the communication is to be made.
Complete Date - The date when the client was actually contacted.
Type - The communication can be a phone call, letter, email, or SMS text message.
User - Which user is assigned the call, or who sent the letter, email, or text.
Call Type - If the communication is a phone call, the call type tells you what type of call to place to the customer (i.e., a reminder to schedule their son's birthday pictures).
Description - The description shows the call description for a call or text, the email subject for an email, or the name of the form letter.
The Appointments tab displays all appointments that are linked to this session. You can create a session-linked appointment by clicking the Appointment button in the New group of the ribbon. Note that appointments that are not created from a session cannot be linked to a session.
The Invoices tab lists the invoice number, date, type, total, amount paid, and balance due. This tab is identical to the one found on the client record, with the exception that the invoices listed here are only for this particular session.
Invoice No. - The invoice number is usually automatically assigned by Spectra.
Date - The date the invoice was created.
Type - The invoice types are Initial Order, Session Fee, Reorder, Credit Memo, and Estimate. These cannot be changed. See the "Features of Invoice Records" topic for more details on the functionality of these different types.
Invoice Total - The total amount due for the entire invoice.
Amount Paid - How much has already been paid toward the invoice.
Balance Due - The amount still owed for the invoice.
(available in ![]()
![]() )
)
The Production tab lists information related to production orders that have been created for this session.
CD Number - Assigned CD number of the disk you archived the images to.
Number of Proofs - If you created proofs from this session, the number will be displayed here.
Storage Location - Where you have the proofs stored in your studio.
You can choose to display production orders or proof orders.
Invoice No./Invoice Date or Session No./Session Date - For production orders, the list will show the invoice number and invoice date. For proof orders, it will be the session number and session date.
Order No. - The number assigned by Spectra to the proof or production order when it is sent to the lab for developing.
Order Date - The date when the negatives or images were sent to the lab for developing.
Vendor - The name of the lab that will develop the negatives or images.
Due Date - The type indicates what was ordered, either prints or proofs.
Status - The status column indicates what step in the process the order is currently on.
The Images tab displays thumbnail images of this session if you have created previews. By default, the image paths are shown based on your settings on the Digital page of Studio Preferences. If you would like to set a different path for this session, you can click on the browse button (...) at the right end of the path and navigate to the drive and folder that contains the images. See the section "Working With the Digital Workflow" for further information.
The Online tab is used to quickly reference this client's information for HoldMyMemories.com and InSpiredByYou.com.
Start Date - Date the client first signed up with HoldMyMemories.com.
User Name - Client's online user name for their personal HoldMyMemories.com site.
Website - The URL of the client's personal HoldMyMemories site.
Start Date - Date the first client session was uploaded to InSpiredByYou.com.
Expire Date - The date this online session is set to expire. When the Expire Date of an online session approaches, you will be notified in the Web Services panel on the Spectra Home page. Note: You must 'take down' each session in order to close the online session for viewing and ordering, as well as to remove the images from your InSpiredByYou.com site. For more information on taking down an online session or changing the expire date, see the following topics: "Using InSpired" and "Tips for Managing InSpiredByYou".
Event Type - You can choose how an InSpiredByYou.com session will be used online.
None - Session will only be viewed by the session client or any invited guests. In order to view the session online, the client must have a username and password or a link sent to them through email.
Private - When this type of event is online, clients need to know the event code in order to view images on InSpiredByYou.com. An example would be a wedding where the code can be communicated to everyone who wants to look at the pictures and maybe even place an order. They will need to create their own InSpiredByYou.com login to view the images and place an order.
Public - This type of event is available to anyone who goes to the InSpiredByYou.com site. They can search by the date of the event or choose the event from a list of recently uploaded events. Again, in order to place an order, they must sign up for their own InSpiredByYou.com login.
To upload an album or photobook design to
the client's InSpiredByYou event page, click New
Album  on the ribbon.
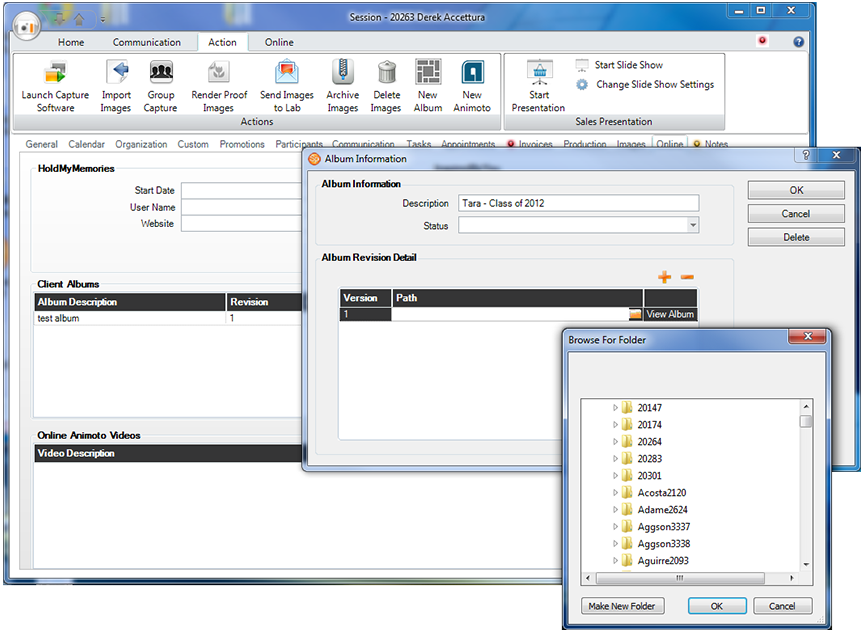
On the Album Information window, add a Description of the album as you would like it to appear online.
Select a Status for the album. Set up album statuses in Maintenance > Studio > Client Album Statuses.
Click  to add a new album for
upload. Browse to the folder that contains the designed album pages,
then select the folder and click OK.
to add a new album for
upload. Browse to the folder that contains the designed album pages,
then select the folder and click OK.
For more information, refer to the "Uploading Albums" section of the "Using InSpired" topic.
To add an Animoto video you've created to your client's InSpiredByYou
event page, click New Animoto
 on the ribbon.

Add a Description of the video as you would like it to appear online.
The Upload Date will indicate "Upload Pending" until the next InSpiredByYou data sync occurs. Spectra will then update the date.
Copy and paste the Embed String from your prepared video and click OK. The video will be uploaded to the client's InSpiredByYou event page during the next data sync.
For more information, refer to the "Uploading an Animoto Video" section of the "Using InSpired" topic.
Session notes - This is a memo field where you can enter any notes regarding a session. You can use Ctrl+T to stamp the current date and time, along with the logged in user's initials, into the log so you can track who entered the note and when. You can also check the spelling by clicking the button labeled ABC.
Status notes - Spectra automatically enters status log notes as a read-only field that displays a history of the statuses for this session. A new entry will automatically be created when the session status changes, when the session date or time changes, who confirmed the session, when a group email or text message is sent, or when a group of form letters are printed.
Click Print These Notes to print the session notes on your session confirmations.
|
PATHWAYS TO SUCCESS Have you noticed our notification lights yet? Throughout Spectra, you may see a red or yellow light. This indicates that there is some important information you should pay attention to. Perhaps the client has an outstanding invoice and owes you money, the client has an overdue phone call, or some notes should be looked at on the Notes tab. Allow Spectra to insure that you and your staff don't overlook key pieces of information when working with your clients. |
![]()